Master class “Mittens knitted on four knitting needles. Simple and beautiful techniques for knitting warm mittens with knitting needles Knitting mittens on 4 knitting needles
Mittens have always been the most practical and comfortable for cold winters. Today there is a huge selection of mittens in stores for the whole family, but it is much more pleasant to wear things that were created with love with your own hands.
Having learned to knit, you can create entire sets: hat, scarf, mittens. They will harmonize beautifully with each other if they are made in the same style with the same pattern.
I propose to go directly to the discussion of the topic: “how to knit mittens with knitting needles - step-by-step instructions.”
How to knit mittens with knitting needles (step by step for beginners)
In order to learn how to knit beautiful stylish mittens, you need to learn how to knit the simplest ones, on the basis of which you can create the most original models for the whole family.
Seamless mittens - master class with detailed description (photo)
The most interesting thing is that even the lazy can handle this model. They can be plain, but the author suggests adding a few red stripes for variety.
Popular articles:
For work we will need wool thread (70 g), 5 double needles No. 3.
The product is knitted from top to bottom on five needles, as a result of which it will turn out without a seam. Calculation of the number of loops: 20 x 1,7 = 34 loops. Distribute 34 stitches onto 4 knitting needles. I suggest rounding up and casting on 36 loops, so we get 9 each.
To make the explanation easier, let's give each knitting needle a serial number. Closing the circle, we knit four loops of the 1st knitting needle together with the end of the yarn remaining on the 4th knitting needle from the set of loops, so that the circle closes tightly around the edge.

The thumb will be knitted on the 1st needle, for the left - on the 2nd. To do this, knit the first loop on the 1st knitting needle with a thread of the main color. All other loops, except the last one, are knitted with colored thread. Then we return the loops connected with the colored thread to the 1st knitting needle and knit again with the main thread. We get a colored touch. This will be the hole for the thumb in the future. Next, we simply knit up to the little finger (about 8 cm).

Then we proceed to decreasing the loops on the toe of the mitten. On the 1st and 3rd knitting needles, at the beginning, we knit the first two loops together with the front one in the second way (at the back walls), having first turned over the 1st loop. On the 2nd and 4th knitting needles we knit two loops together at the end of the knitting needle using the first method (behind the front walls). So we decrease the loops through the circle until each knitting needle has half the number of loops (in our case, when the number of loops on each knitting needle is odd, we decrease the smaller part through the circle - 4 loops), then we decrease the loops in each circle (5 loops). At the same time, on the 1st and 3rd knitting needles, in those rows where we do not decrease the loops, we also turn the first loops over and knit them in the first way. When there are 2 loops on each knitting needle, tighten the loops and secure them on the wrong side.
Now let's get started thumb tying. To do this, carefully pull the colored thread out of the thumb hole. Then we insert two knitting needles into the free loops, we get 7 loops on the lower knitting needle, 6 on the upper knitting needle. We begin to knit the finger, distributing the loops on 4 knitting needles: 4 loops on the first, 3 on the second and pull one loop from the side edge of the hole, on the 3rd and the 4th knitting needle will also have 4 loops (3+1 from the side edge of the hole). To make it more convenient, the end of the working thread can be lowered into the hole (on the wrong side of the product).

We continue to knit the finger in a circle until the middle of the nail, and then begin to decrease the loops in the same way as when knitting the toe of the mitten: on the 1st and 3rd knitting needles at the beginning, on the 2nd and 4th knitting needles at the end, but decreasing We do it in every row. When there is 1 loop left on each knitting needle, we tighten the loops and fasten them on the wrong side.
Left mitten knitted similarly to the right one, but in a mirror image: we knit the hole for the finger on the 2nd knitting needle.
Step-by-step instructions for knitting on two needles
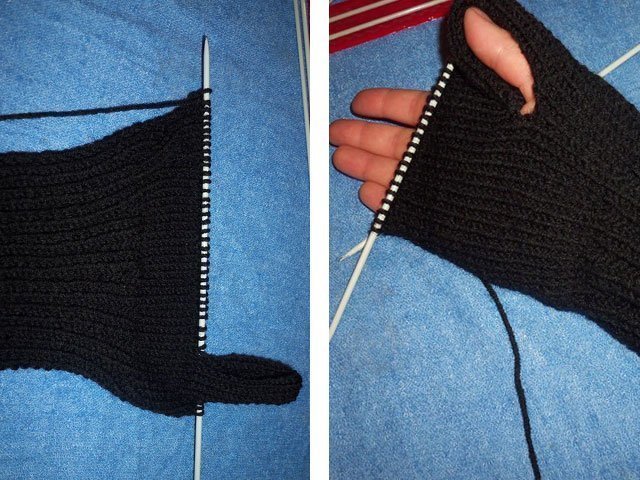
These long mittens can also be knitted on two knitting needles. You can knit two parts separately and then join the halves, but we will consider the option where you only have to make one invisible seam (this will be correct and visually more beautiful).
Needed: yarn, knitting needles, regular and knitting pins, measuring tape, hook, needle.

Let's start with the right part.
We measure the circumference of the wrist, the length of the palm and thumb. It is also necessary to measure the knitting density by knitting a little. We measure how many loops there are per 1 cm. My girth is 20 cm, there are 2 loops in 1 cm. You need 40p-4 = set of 36p + 2 edges.
We start from the bottom with a 2x2 elastic (knit 2, purl 2). It turned out to be approximately 10 cm (15 rows).

Next, we move on to the main fabric, where you can choose knitting needles of a smaller diameter. In the second row, add 4 stitches evenly. Next we simply knit 7 rows to the base of the thumb. You can try on and knit more/less if necessary.
The finger in the mitten is not on the side, but somewhat closer to the palm, so for the right mitten we knit as follows.

- A. - edge, 2p. We knit according to the drawing and remove it with a regular sewing pin.
- B. - For a finger, take 6-7 loops. Depending on completeness. We knit 7 loops according to the pattern, and remove all the remaining ones with a pin.
- V. - we only have 7 thumb loops left on the working knitting needle.
We knit in height with the main pattern, without edges!!! We multiply the length of the finger by 2. My finger is 6 cm * 2 = 12 cm in height. 21 rows came out. WE KNIT THE FIRST AND LAST ACCORDING TO THE DRAWING!!! We return the loops from the large pin to the knitting needle.

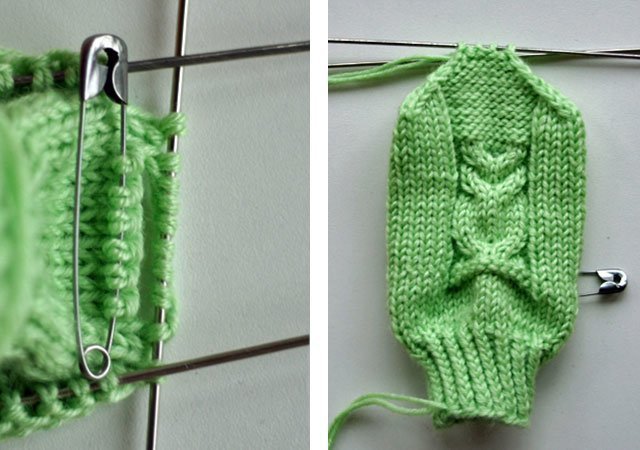
Divide all the loops by 2. Slip one part onto a pin.

Let's start cutting down.

We knit the purl row according to the pattern. I don't have 20 stitches on my needle. I knit like this: edge, knit 1, knit 2 together, knit 12, knit 2 together, knit 1, purl 1. Total 20 stitches. We shorten this way in each front row until there are 6-8 loops left on the knitting needle. I have 7.

Close the loops and do the same procedure with the second half. To finish correctly, simply knit two stitches together, transferring the knitted one to the main needle.


From these lessons we can conclude that knitting is not that difficult. Knitting mittens requires basic knowledge and a little free time.
Knitted mittens with a pattern (diagrams and description)
Having learned to knit the simplest patterns, you can dilute them with beautiful patterns, giving free rein to your imagination. In the article “” you will find them in large quantities.
And now I suggest switching to more complex mittens with knitting needles (diagrams and descriptions will help you understand this difficult task).
How to knit beautiful mittens with braids for women
Mittens with braids, knitting patterns and descriptions for lovers of the classics.
The braid will be the main decoration. We chose a simple braid, but if you are not afraid of difficulties, you can choose a more complex and original option.
Yarn - acrylic (can be made from angora), approximately 70 g; stocking needles No. 3.5.

Elastic pattern: K2, P2.
Knitting a braid pattern: 8 loops cross to the left (leave 4 loops on the auxiliary needle before work, knit 4 and knit loops from the auxiliary needle).
Cross 8 loops to the right (leave 4 loops on the auxiliary needle while working, knit 4 and knit loops from the auxiliary needle).
Cast on 48 stitches and distribute them onto stocking needles, resulting in 12 stitches on each needle. Knit with a 3.5 cm elastic pattern (if the elastic is not enough for you, knit more than cm).
Then, we start knitting the main pattern. For the convenience of knitting the “braid” pattern, I transfer the loops from the 1st and 2nd knitting needles to one knitting needle. Those. I have the loops distributed over 3 knitting needles (not 4 knitting needles), on the first knitting needle there are 24 loops of the main pattern, and on the 2nd and 3rd knitting needles from the palm side there are 12 loops each.
So, the first row after the elastic begins with a knitting needle with 24 loops, we begin to knit the main pattern.
Rows 1-6: K1, P2, K8, P2, K8, P2, K1, knit stitches on 2 knitting needles from the palm side.
7th row: K1, P2, 8 loops cross to the left, P2, 8 loops cross to the right, P2, K1, loops on 2 knitting needles from the palm side we knit. Repeat rows 1-7 throughout the entire work.

At a height of 10 cm from the beginning of knitting (you don’t have to have 10 cm, everyone’s hands and fingers are different), we form a hole for the thumb. Let's start with the left mitten. On the knitting needle from the side of the palm (3rd knitting needle) we knit 4 knits, remove 6 sts on a pin, put 6 sts on the knitting needle (so that there are 12 left, as before), k2.
We knit the hole for the thumb of the right mitten symmetrically, i.e. on the second knitting needle from the palm side: knit 2, knit 6, slip onto a pin, and knit 6, knit 4 on the knitting needle.
Formation of the toe carried out after the little finger on the hand is closed.

For a rounded toe, knit two middle stitches together on each needle.
Decrease stitches in each row until only 1 stitch remains on the needles (4 in total). After this, tear off the thread of the ball and thread it into the needle. Use a needle to pick up all 4 stitches, pull them off and fasten them from the inside of the mitten.
After the two mittens are knitted, we begin knitting the thumb. To do this, remove 6 sts from a pin onto a knitting needle, cast on 6 sts on a parallel row and cast on 4 sts on two side rows. In total, we got 20 stitches, distribute them onto 4 knitting needles (5 stitches per knitting needle).

And we knit circular rows of faces. to the required finger length. We form the toe of the finger similarly to the formation of the toe of the mitten.
Knitting mittens for children
Children really love it when their mother creates, for example, beautiful foxes or bears with her own hands, which they can put on their hands and go play in the snow.
Knitted children's mittens with owls
There is nothing more interesting for a child than mittens with a pattern. He wears such things with great pleasure, so I propose to please the child with wonderful owls.

Materials and tools:
1 skein;
stocking needles No. 1.5;
additional knitting needle or special stitch remover;
yarn needle;
four beads;
thread and needle for sewing on beads.
The mittens are knitted in two threads.
So, we cast on 32 loops, distribute them onto 4 knitting needles (8 on each).
Rows 1 - 10: knit 1 rib. x 1 purl.
11th row: faces.
Row 12: knit; add 2 persons from the broaches. on every spoke
13 - 18 rows: faces.
Row 19: we begin to knit the “owl” on 12 loops of the third and fourth knitting needles. The first knitting needle is knitting; second knitting needle - faces; third needle - knit 4, purl 6; fourth needle - 6 purl, k4.
Row 20: same as row 19.

21 row: first knitting needle - knit.; second knitting needle - k2, slip 6 stitches onto a pin for the thumb hole, cast on 6 additional stitches, k2; third needle - k4, p2, k4; fourth needle - k4, p2, k4.
22, 23 rows: first knitting needle - knitting needle; second knitting needle - faces; third needle - k4, p2, k4; fourth needle - k4, p2, k4.
Row 24: first knitting needle - knit; second knitting needle - faces; third knitting needle - knit 4, purl 2, remove 2 loops for additional stitches. knitting needle at work, knit the next two knit stitches, then knit stitches. spoke - persons; fourth knitting needle - remove two loops for extra. knitting needle before work, knit the next two knits., then loops on extra. knitting needles, knit 2, knit 4.
25 - 31 rows: first knitting needle - knit, second knitting needle - knit, third knitting needle - knit 4, purl 2, knit 4; fourth needle - k4, p2, k4.
Row 32: same as row 24
33 - 35 rows: first knitting needle - knitting needle; second knitting needle - faces; third needle - k4, p2, k4; fourth needle - k4, p2, k4.
36th row: same as 24th and 32nd.
Row 37: first knitting needle - knit; second knitting needle - faces; third needle - k4, p2, k2, p2; fourth needle - p2, k2, p2, k4.
38 - 41 rows: first knitting needle - knitting; second knitting needle - faces; third needle - knit 4, purl 6; fourth needle - 6 purl, k4.
Row 39: we begin to decrease. First knitting needle - knit the first 2 stitches together. behind the back wall; second knitting needle - knit the last 2 knit stitches. behind the front wall; third needle - knit the first 2 stitches together. behind the back wall; fourth needle - knit the last 2 knit stitches. behind the front wall. Knit the remaining loops according to the pattern (knit and purl)
When there are only 8 loops left on the knitting needles, tighten them with a needle. For the thumb, transfer the 6 loops removed on the pin to the knitting needle, and cast on 2+6+2 loops from the edges onto three knitting needles.

We knit 12 rows in a circle. Then we transfer all the loops to two knitting needles and begin to decrease: on each knitting needle we knit the first 2 loops together behind the back wall, the last 2 - behind the front wall. We knit the second mitten in exactly the same way - only we leave the hole for the thumb not on the second knitting needle, but on the first.

Sew on bead eyes and enjoy this wonderful new product for winter.
Ideas with bullfinches (embroidery)
Having simple mittens on hand, you can decorate them with original embroidery, which will look great in a children's set.


Video lessons from the best masters
YouTube today has become a real treasure trove where you can find a huge number of educational videos. For example, on Svetlana Bersanova’s blogs you can watch a video lesson for free. And there are quite a few such good authors. You can find a mentor to your liking and receive valuable knowledge absolutely free.
Original mice or white hedgehogs for kids
How to knit mitts
Warm openwork for girls (double mohair)
Interesting two-color minions for a boy 7-8 years old
Jacquard products (video tutorials)
Jacquard with a winter theme is a classic that will always be relevant, so I suggest moving on to the most complex options that require maximum time and attention to detail.
Original knitting with ornaments (Norwegian patterns)
For girls with deer
If you want to learn how to knit a complex but very original “deer” pattern, this lesson with a detailed description will help you.
Men's mittens with arans for little men
If you learn all the lessons we offer, you will be able to fantasize and create products of any complexity: women's gloves without fingers, with a folding top, with a false pattern, from thick yarn and embroidery. Good luck in your endeavors. Try, experiment and pamper your family with pleasant fagots.
In winter frosts, it is especially important to keep the child’s hands warm. Therefore, you will probably find the master class useful, how to knit double mittens (with lining), prepared by Vera Ponomarenko. In addition, Vera’s turned out to be very beautiful and elegant, you can see them in the photo. The description of the work is designed for the age of a child: 3-4 years, but using this principle you can also knit mittens of large sizes.
Double mittens (knitting)
Do you want to knit mittens for your child, but don’t know how? The master class on knitting children's double mittens will help you find the answer to your question. Use your imagination, and this is no longer just a part of everyday life in frosty weather, but also an excellent gift for your favorite holidays. After all, we have been taught since childhood: “The best is made with your own hands!”
- Yarn: Moscow LAMA “Russian motif” (100 g / 300 m, yarn composition: 40% wool, 60% acrylic)
- Marker: piece of contrasting thread – 12 cm
- Needles: two sets of double needles 2.5 mm and 3 mm.
Description
To keep the mittens on the wrists and not slide down, which is especially important for children, knitting must begin with an elastic band. In this example, one of the popular options is used - k2, p2. And so that the product does not lose its presentation during subsequent wear, the elastic should be knitted with knitting needles of a smaller size than the main part is supposed to be knitted.
On stocking needles with a diameter of 2.5 mm, cast on 40 sts. Evenly distribute 10 sts on each of the four knitting needles and knit 2x2 rib for the next 50 rows. As the product begins to add row after row, it may seem that at the 20th row it is time to stop and move on to knitting the palm and thumb. But since the presented sample of mittens is double (with lining), this number of centimeters of elastic will fold in half.
So, after 50 rows, it was the turn of the stockinette stitch. At the same time, it is necessary to replace the knitting needles with a 3 mm diameter. Continue knitting another 8 rows. The thumb will begin in the 9th.
The methods for knitting the thumb of a mitten are varied. This master class describes the simplest of them. To do this, knit 4 knit stitches on the first knitting needle, insert a thread of a different color (marker) and knit the remaining 6 knit stitches on the knitting needle.

Return to the main color yarn, finish the current row with knit stitches, plus another 28 circular rows (total - 37 rubles from the rib).
In the next row, i.e. 38th, starting from the first needle, start decreasing along the edges. At the same time, on the 1st and 3rd knitting needles, slip the penultimate loop onto the right knitting needle. Knit the last loop and pull it through the removed one (i.e. 2 stitches along with a tilt to the right). But on the 2nd and 4th knitting needles the inclination should be to the left, i.e. Knit the first loop and pull through the second. Thus, decrease until there are two loops left on the knitting needles (total: 8 stitches). Cut the thread at a distance of 5 cm and tighten the remaining loops. The remaining piece of yarn will be needed later to fasten the outer and inner mittens together.

Return to marker. Using a knitting needle, pull the thread out of the fabric. Cast on the dropped stitches on the knitting needles. Total: 6 sts at the bottom and 7 sts at the top. On the bottom row, pick up one more side loop on each side. They must be knit crossed in the first row to avoid the appearance of holes in the fabric. In total, knitting the thumb is carried out on 15 loops for the next 17 rows.


The outer one is ready. It's time for the "lining". To do this, cast on 40 stitches along the bottom edge of the elastic so that the outer loops remain behind the work.

Work the next 8 rows in stockinette stitch. In the 9th row, knit 6 loops with a thread of a different color parallel to the thumb on the outer mitten. Return to main yarn. Continue working with knit stitches for the next 26 rows. In total, the elastic band should make 35 rows. Make reductions. Pull the last 8 loops together with thread, leaving a 5-centimeter tip.

Knitting the thumb of an inner mitten is no different from the method described earlier. The only difference will be the number of rows, which are half a centimeter less (15 rows in total).
In the end it turned out double mitten.

Using the previously left ends of the yarn, fasten both parts from the inside and turn the fabric inside out. This must be done so that the child does not suffer in the future when putting on and taking off gloves, because the lining will remain in place under any circumstance.
Perform the right mitten following the example of the left one.

The only exception would be the choice of knitting needles for thumb knitting. So, on the outside of the fabric, insert a marker at the beginning of the IV needle. The inner thumb, accordingly, will be located parallel to the outer one. The choice of knitting needle in this case will depend on the beginning of the set of loops along the edge of the elastic band.
Make a twisted lace. To do this, you need to cut the thread to the required length. Fold the piece in half. Secure one end with a heavy object, and start twisting the thread with your fingers on the other side. The longer you twist the piece, the tighter the lace will be. Next, fold it in half again, straightening it along its length. Tie one end into a knot to prevent deformation. Using a hook, pull the lace behind the front stitches at a height of 10 rows from the front stitch.

Decorate the ends with pom-poms.
The final step will be applique on the outer mitten. It could be a flower or a butterfly if the children's mittens are intended for girls.


A boy's pair of mittens will be decorated with a snowman or a bear. It all depends on the author’s imagination.

Happy creativity!
More interesting:
See also:
Children's mittens "Kittens" (crochet)
In winter, it is simply impossible to do without such a simple piece of clothing as mittens. However, they can be made...
Elegant spring set for girls: scarf and mitts
Knitting children's clothes for girls is a great pleasure for the needlewoman. You can enjoy the bright...
Men's mitts, crocheted
We have a master class on knitting women's mittens. On the eve of the men's holiday - Defender's Day...
Knitted gloves. Master Class
New master class on knitting gloves from Olga Arisep. With this step-by-step instructions...
Very soon it will get colder outside and you need to insulate your little ones little hands. And no matter how warm, knitted by mother’s hands, will keep you warm in the cold. They have so much warmth, comfort and love. No store-bought mittens can compare with handmade mittens. Knitting children's mittens on 5 knitting needles is quite simple and quick; we need very little material, which is why they will cost you much less than store-bought ones. So, let's get started... let's knit mittens for a 2-3 year old baby.
We need:
- yarn YarnArt Jeans 1 skein
- knitting needles No. 3
- tapestry needle for stitching knitted items
Children's mittens with 5 knitting needles, for beginners:
We cast on forty loops onto the knitting needles, after which we distribute them equally among four knitting needles, i.e. ten loops on each knitting needle.

Next we will knit an elastic band for mittens according to the 2 x 2 principle, i.e. We knit alternately first two front loops, then two purl ones. We knit mittens in the round.
We knit fourteen rows with an elastic band. 
Next we move on to knitting, we will knit all rows with knit stitches. We knit nine rows with facial stitches. 
At this stage, we will leave room for the future finger; for this we knit the first six loops on a separate knitting needle, after which I put the loops on a pin so that they do not interfere with our further work. We will return to them later. 
Next we knit the four remaining loops, then knit the loops on the next three needles. Now we put six loops on the knitting needle plus knit four loops. 

We knit the next 14 rows without changes. 
Now we need to complete the knitting, for which on the first knitting needle at the end we decrease two loops by knitting them with one front one. Next, on the second knitting needle we decrease two loops at the beginning, on the third knitting needle - two loops at the end and on the fourth knitting needle at the beginning we also decrease two loops. 
We decrease according to this principle until one stitch remains on the knitting needles. 
We cut the thread, thread it through a tapestry needle and thread it through the remaining loops, pull it tightly, and hide the thread inside the mitten. We get a palm like this. 
All that remains is to tie the finger. We return to our set aside six loops. We cast on six more loops from the opposite side onto the second knitting needle. 
We knit ten rows in the round. 
We remove the loops from the knitting needles, cut the thread and thread it into a tapestry needle, thread it through all the loops, pull it together, fasten the thread, bring it to the wrong side of the finger and cut it off. 
Children's mitten knitted on 5 knitting needles, ready. 
We knit the second mitten in the same way as the first. I hope this master class will be useful for beginning craftswomen. 
It is believed that all women know how to knit and, if not with a large item, then with a small one, they should be able to handle it. For example, with a scarf or mittens. It is with this item of clothing that beginners in knitting are often advised to start learning how to knit. But for beginning knitters, knitting in the round often becomes a problem. We suggest that you first try to knit mittens for children using a simple flat layout on two knitting needles.
Our master class with a detailed description will help you make the first pair and understand the principle, and in the future you can easily knit on 4-5 knitting needles in the round, without additional stitching of the product.
We knit warm mittens on 2 knitting needles for children of any age
Mittens are always knitted starting from the wrist, and it is very important to initially cast on the correct number of stitches, so as not to unravel the product later and not to redo the work. We present you a table for calculating loops. All you need to do is measure the circumference of your child’s wrist with a centimeter.

This table is suitable for any method of knitting mittens.
You will knit according to this layout, checking the description of the work.
1). First, knit 10 rows of elastic according to the pattern: 1 purl loop, 2 knit stitches, etc.
2). Then there are 7 rows of facial loops.
3). In the middle of the next row, add 1 loop to widen the thumb and repeat the same in the next three rows.
4). Separate the thumb loops from the palm loops. If you check the diagram, there should be 13 of them, but make an even number - 14. These loops remain on the knitting needles, and the rest are removed with thread.
5). Knit the entire length of the thumb with facial loops, knit all the last 2 rows of loops 2 together and pull the remaining ones at the end into one. Using this thread of yarn, sew the finger on the side.
6). Now, having returned all the loops from the thread to the knitting needles, knit with facial loops in a straight line. And, before closing your palm, narrow it according to the diagram.

7). Cast off the last row as usual. But first, all the remaining loops are put on one knitting needle, alternating 1 loop on the front and back sides of the mitten. Then knit 2 loops together, return the resulting loop to the knitting needle, then 3 together, received back and so on until the end of the row.
8). You can decorate the mitten with embroidery, felt appliqué, or, as here, a crocheted snowflake.
9). Sew the side seam. If desired, you can also add a fleece lining.
Let's try to make beautiful mittens on 4 knitting needles (or 2 circular knitting needles)

This example, a little more complicated, shows how to knit mittens for children on circular or sock knitting needles No. 2.5. However, the scheme is also not complicated and is suitable for beginners.
1). For approximately a three-year-old child, you need to cast on 32 loops and knit 16 rows of elastic (1 knit, 1 purl).
2). The next rows are knit stitches. If you want to make a stripe on a product with yarn of a contrasting color, then knit 3 rows with such yarn (you don’t have to break the original thread, and then pull it on the wrong side). Knit another 5 rows with base color yarn.
3). Begin to knit a hole for the thumb of your right hand. To do this, knit 2 stitches, slip the next 6 stitches onto a knitting needle, or more conveniently onto a large pin, and finish the row with knit stitches.
4). So knit 15 rows with the main color (break it off) and 4 with the additional color. Try on the mitten; it should be long enough to reach the tip of your little finger; if not, knit a couple more rows.

5). Distribute the stitches on 2 knitting needles in half and knit on each, but in a decreasing circle: 2 stitches on each side of each row (through the circle). That is, in one row the number of loops is reduced by 4 pieces, in the next it remains unchanged. Alternate rows until you have 10 stitches on the needles. For the next few rows, remove 2 stitches on each knit row. And as soon as there are 10 of them left, knit like this: 2 together, 1 knit, 2 together, 1 knit. Gather the last 6 loops by pulling the thread through them and tighten.
6). Tie out your thumb. Transfer the loops from the pin to the knitting needles and with yarn of an additional color, knit 13 rows in a circle, then 2 rows together and tighten the end of the thread. Bring all the ends of the threads to the wrong side.
The left mitten is knitted symmetrically. You can embroider a design with yarn.
The photo shows a pattern of a butterfly for embroidery using a “loop” stitch.
Master class on knitting bright mittens on 2 circular knitting needles
This method is unusual. It was invented either by very impatient people who want to knit both mittens at once without wasting time, or by very pedantic and neat people who are afraid that the second mitten will not turn out to be an exact copy of the first. Be that as it may, such a method exists. You need to get ready and wind the yarn into two balls. It’s not very convenient to look at the details of this method in a photo, so we included a master class with a detailed description in the video selection.
Video on the topic of the article
After learning how to knit mittens for children and watching the video, you will be able to make such mittens for adults.
A good way to become the owner of unique mittens is to knit them yourself. It is more convenient to crochet a small-format circular item, but there are many ways to get by with knitting needles - five or two. Beginners should study different techniques in theory and choose the one that is easiest to understand and implement in practice. Simple mittens are easy to knit, but they are unlikely to become original unless they are additionally decorated with embroidery or appliqué, including 3D ones. Even if you are not confident in your knitting skills, you can achieve an interesting result if you apply maximum imagination to your mittens.
Where to start knitting mittens
To knit a product, you must first have a good idea of it. Not abstract mittens, but the kind you would like to wear or give to a relative or friend. You need to decide on the color of the mittens, their thickness (for severe frosts, for light winters, for the demi-season period), and their purpose (for sports, going out, for everyday wear). Women's and men's mittens can be decorated with a pattern, but in the first version it can be delicate or elaborate, and in the second it can be more strict and laconic.
Children's mittens should be made from safe materials, but at the same time very durable. Little naughty kids put their mittens under constant stress: they either build a snowman, or slide down a hill, sliding on the ice or running their palms along the wooden side. And as the children grow up, skiing and skating, building snow forts, etc. will become their usual hobbies. This is an even greater burden on the mittens. That is why it is recommended not only to tie them, but also to provide the inner side, which falls on the palm, with waterproof and low-abrasion material.
Yarn selection
Very thick threads, as well as knitting needles, are not suitable for small accessories. The finer the texture, the more interesting the designs can be on the mittens. It is most convenient to knit with knitting needles 3 mm or thinner. The yarn should not exceed the thickness of the diameter of the knitting needles.
For cold weather, it is good to knit down mittens, but it is better to add synthetic thread to pure down yarn for strength. You can also use mohair with the addition of synthetics. Colored acrylic yarn is great for demi-season mittens. It is good for making mittens - mittens without fingers. This accessory is indispensable for those who have to spend a lot of time driving.
Selection of scheme and pattern
Here everything completely depends on your imagination. Some people prefer jacquard patterns, traditional for factory-made mittens. Some people prefer to knit plain mittens with knitting needles and then decorate them with crocheted details. Some people prefer embroidery on the finished product. But even for such a small thing, you can choose a textured ornament, made immediately with knitting needles. Experienced craftswomen can make “bumps” and “aranas” on mittens. Openwork patterns only make sense for mittens or double-layer mittens.
Beginner knitters should choose the simplest pattern or stocking stitch in order to master the techniques of creating mittens with knitting needles. You can decorate the mittens later - with embroidery, beads, beads, sequins. If you want to do everything at once, then you should choose thread with lurex for the mittens.
Knitting mittens - instructions for beginners
In simple terms, the mitten consists of two “chambers”: the smaller one for the thumb, the larger one for the palm. People who are inexperienced in knitting should study in detail how to knit the transition from one “chamber” to another so that the mitten turns out to be solid. When performed on two knitting needles, you get one beginning - an elastic band - and two ends: one on the finger, the second on the main part. We will return to the elastic band later, but now we will look at how the main part of the mitten is knitted with five knitting needles. To make a beautiful transition from the elastic to this part, you can add one loop in the middle of each of the four knitting needles. To prevent a hole from forming, an additional loop should be made not by yarn over, but by knitting it from the broach between the loops. Next, the mitten is knitted in the round to the point where you need to move to the thumb.
Here you should knit a thread of a different color without fastening it, since you will have to take it out later. From the first knitting needle we knit one loop with the main thread, then replace it with a thread of an alternative shade, and knit all the loops from the knitting needle to the last one. Then remove loops of a different color one by one from the working needle and string them onto the 1st needle. We knit these loops again with the main thread, then we knit the last loop that remained on the first knitting needle, and continue knitting on the remaining three knitting needles. The base for the thumb is ready.
We continue knitting mittens with knitting needles until the end of the little finger. For some people, the little finger is much shorter than the other fingers. Then you can knit a few more rows - up to the nail holes on the ring or index finger (depending on which one is located lower on the raised palm). From this point you can move on to gradually closing the loops - forming the toe.
Decrements are made at the beginning of needles 1 and 3, as well as at the end of needles 2 and 4. On knitting needles 1 and 3, the first loop is removed from the front wall, the second loop is knitted and pulled through the first. On needles 2 and 4, the penultimate stitch is knitted and returned to the non-working needle. Using a working knitting needle, we pull this loop into the last loop that remains unknitted. So we close until the moment when there are a couple of loops left on the knitting needles. They can be pulled through each other one after the other, and the cut thread can be pulled into the last loop and tightened. Hide the thread in the knitting.
How to tie a thumb
It's time to return to the colored thread - the thread for the thumb. It needs to be carefully pulled out, and the loops on both sides caught on two knitting needles. You need to pick up a pair of loops from the side walls of the hole using the remaining two knitting needles. Distribute the stitches on four needles evenly and knit the thumb in a circle. You can close it with the same “wedge” as the main part of the mitten.
How to knit an elastic band
It’s easy to knit a beautiful elastic band for a mitten. You need to cast on two knitting needles the required number of loops, a multiple of four. Next, the loops are distributed equally onto four needles. The knitting needle where the tail of the thread ended up is called the first; The rows are counted from it. We begin to knit a 1 x 1 elastic band. As soon as we reach the second row, we knit as the loops “look”. We knit the front loops on the front wall, and the purl loops on the back wall. Then we will get the same beautiful elastic band as when knitting in rotary rows. In order for the elastic to fit well around the wrist, it must have a sufficient height - 4-5 cm.
Mittens with 2 knitting needles
Using two knitting needles you can knit a mitten with a seam. It is knitted in the form of a sweep, and then its parts are connected. Knitting begins with taking measurements. Next, cast on the required number of loops for the elastic, a multiple of 2, plus two edge loops. The elastic is knitted according to the 1 x 1 pattern of the desired height (4–5 cm). Let's move on to the main part of the mitten. If it is necessary to make an extension, then add loops evenly, knitting them with a knitting needle from the broach between the two loops of the previous row.
When we reach the beginning of the thumb, we knit a couple of loops, then remove the number of loops required for the finger onto additional knitting needles (a pair of flexible knitting needles) of the same diameter. You can calculate the number of loops as half the circumference of your thumb plus a small margin to make it easier to put on and take off the mitten. Next, we knit only these loops with additional knitting needles until the end of the thumb. We check the size and continue knitting so that the resulting strip freely goes around the thumb in length.
Now we return to the main knitting needles and put the loops from the end of the strip onto the working knitting needle. We knit to the end of the row, turn the knitting and continue to knit all the loops, including the “finger” ones and those that remained knitted before the finger was formed. We reach the end of the mitten and divide the loops in half. Again we will use additional knitting needles, where we will remove half the loops. We knit the remaining part with decreases on both sides. When a third of the total number of loops remains on the knitting needles, you can simply close them off. We take additional knitting needles and knit the same thing on them. We sew the side parts of the thumb on the wrong side, and then the entire mitten. We use a knitted seam.
How to finish a mitten
Knitted mittens often end with a wedge, but not everyone likes this pointed edge. You can round the mittens a little, giving them a more feminine silhouette. The faster the loops decrease, the more obtuse the angle is at the end of the mitten. If we work with five knitting needles, then on each of the four “well” knitting needles we need to make two decreases - in the middle and at the end, knitting two stitches together. So you need to reduce the number of loops row by row until there are 4 or 8 loops left. They can be combined by knitting into each other or tied with thread. The toe will be flat and neat.
Knitting mitts with knitting needles - diagrams with descriptions
It’s even easier to knit mittens with knitting needles: you won’t need any decreases at the end of the mittens or the wisdom of doing the thumb. Sometimes the mitts contain a wedge into which the thumb comes out, sometimes there is just a hole. The most closed version of the accessory has a thumb tube topped with an elastic band. A similar elastic band is made along the edge of the wide part of the product. The simplest version of openwork mittens can be tied with a finger hole.


The peculiarity of openwork mittens is that they are well ventilated, it will not be too hot in them, and besides, such an accessory is perfect for a cardigan knitted with a similar pattern. The ornament should be placed on the outer side of the palm, the inner side can be knitted with a smooth fabric from facial loops or also made into an openwork pattern. First, you should knit the sample with the same knitting needles that you take for work, measure it and calculate how many loops you need to cast on in a circle for the palm part. To do this, the circumference of the palm is first measured.
You need to start knitting with an elastic band. Its size depends on the circumference of the wrist. You can also knit a separate elastic band and measure how many loops fit around your wrist. When knitting with five knitting needles, do not forget that you need to make sure that instead of elastic, you don’t get “millet”. If we see a front loop, then we must also knit a similar one above it.
Having knitted 4–5 cm with an elastic band, we move on to the main ornament of the open mitten. If an extension is needed on this part, then add a loop, knitting it from the jumper between the loops of the previous row. If you need to decrease the loops, then simply knit two loops at an equal distance from each other. While the openwork pattern is worked in the round, odd rows are knitted according to the pattern, even rows are knitted. But as soon as we approach the thumb hole, we have to switch to turning rows, although knitting continues with five knitting needles. And then even rows need to be knitted exclusively with purl stitches. As soon as the edges of the hole need to be closed, you will have to switch back to circular knitting, therefore, even rows need to be made with facial loops. You can finish knitting with an elastic band 1–2 cm long, and then close the loops.

Making thick mittens with a pattern is somewhat easier than knitting mittens. The difficulty may be the wedge for the thumb. If we have an ornament on the outer part of the mitts, then along the inner side and the wedge we should make a smooth fabric in stocking stitch. The beginning of the wedge is located not far from the elastic - after a couple of rows. The basis for the wedge is the second loop on the first needle. To make it symmetrical, you need to yarn over on both sides of this loop or knit a new loop from the jumper. The second option is preferable, because this way you won’t get holes in the knitting. Increases must be made through the row. Then try on the product to see if it has reached the base of the thumb. We knit a couple more rows and remove the wedge loops onto an additional knitting needle or pin. We close the remaining loops in a circle and knit to the base of the remaining fingers. Close the loops and transfer the knitting needles to the wedge. From the side loops of the hole we cast on half as many loops as we have left on the pin. Next, knit a small elastic band in the round with knitting needles and bind off the loops.

For the little ones, it’s also easy to knit mittens. The product turns out to be so miniature that the minimum amount of time will be spent on it. But you can give free rein to your imagination by designing the mittens to look like cartoon or fairy-tale characters. You can also come up with a lot of different decorations. There is no difficulty in knitting small things; you just need to take a tool with a smaller diameter if you want to make a pattern on the mittens.


What patterns should I choose to knit mittens for a girl? Delicate, floral, airy. The main thing is not to forget that mittens are needed for warmth, and that the child should be comfortable in them. There are several options for how to decorate mittens made with knitting needles. It's easy to knit mittens with an owl. The night bird will have to make eyes from two small beads. For infants, it is worth making mittens with knitting needles without knitting the thumb separately. It’s better for kids when the whole hand is in one “container”, because it’s warmer for all the fingers. It’s good to make such mittens with ears and embroider a kitten’s face. This item of children's clothing is often called “scratch mittens,” but not because it can scratch, but because a child wearing such mittens cannot accidentally scratch his face.

Older children can knit mittens with knitting needles equipped with a thumb. To the delight of the baby, it is worth making an image of cat pads on the inside of the mittens. They can be knitted directly with knitting needles or crocheted separately and sewn on as an applique.
Knitted mittens - with hares, foxes, bears and bullfinches - are equally good for boys and girls. Only the color scheme will differ.
For a child, you can knit mittens using knitting needles using the same pattern as for an adult. We have already learned how to make an elastic band and the transition to the thumb. All that remains is to figure out how to make an interesting pattern using only knitting needles. First, let's audit the remaining yarn and evaluate what shades are available. Let's select an interesting picture in the desired color scheme. For example, leftover blue, red, black and brown yarn will allow you to make a bullfinch on a branch. If there are several shades of green and brown, you can make mittens with a tree.


It’s good if you have a picture that is pre-divided into squares for knitting. But if this is a cross stitch pattern, then it will have to be slightly transformed. Knitted fabric stretches in width. The drawing will also stretch out. Therefore, you need to knit a test sample of garter stitch 10 x 10 stitches with the selected yarn and knitting needles that you intend to use. Next, we measure how many centimeters in length and width we have in our sample, make up the proportion and re-divide the drawing into squares with the correction.

 Knitting "Cat" pattern
You need to start knitting mittens with knitting needles from the main tone, making an elastic band for them. Next, we move on to garter stitch and introduce threads of other colors. It is advisable not to tear them off each time and tie them with a thread of the main or another color, but to lay them down while working. To prevent the threads from interfering in the future, they should be hidden in the knitting or sewn from the inside out into interlining in place of the design. This way, the child’s fingers will not get tangled in the stretched strings.
Mittens knitted - beautiful knitting
The textured knitting on the mittens is no less interesting. If you have learned how to use knitting needles and a knitted pin well, then it will be easy for you to make “braids”, “ropes”, “tulips” and other ornaments with overlapping loops - “aranas”. It’s better to watch a video on how to do this rather than explain it in text format.


An interesting idea is to knit mittens for lovers. At the stage of a romantic relationship, it is so nice to walk down the street holding the hand of your loved one. But when both hands are in mittens, it is difficult to feel each other's warmth. Therefore, the set for lovers contains only three mittens: two regular and one double, with two cuffs and a common chamber for two hands. It resembles a curved muff. If you start knitting it from elastic bands, you will have to use two sets of knitting needles, knit an elastic band on each of them and another couple of centimeters with the main pattern.
Then you will have to redistribute the loops and knit a common “well” with only five knitting needles to the desired height. Make decreases at the top in exactly the same way as for an ordinary mitten. When knitting a double mitten with knitting needles, you do not need to make a separate cover for your thumbs. Let them all be inside, because it’s more convenient to hold hands.


Have you been able to master knitting mittens? Get started on the men's mitts. A husband or father will need them when driving a car. And when repairing a car in cool weather, this is generally an irreplaceable thing. These mittens give complete freedom of movement, do not affect the sensitivity of the fingers, but still provide warmth.
It is also worth arming yourself with knitting needles and knitting separate caps on your fingers for such mittens. The caps must overlap the length of the mitts so that they can be fastened. On the outside they can be secured with a button, but on the inside of the palm such a fastener will become a hindrance. It's better to use Velcro here because it's flat.
Another reason to knit transformable mittens is the constant need to use a touch phone or tablet. Gadgets are sensitive to the heat of hands, and sometimes you have to expand or contract the image, but this cannot be done with a mitten.
Knitting men's mitts is easy: you don't need any complex patterns, you can get by with a modest garter stitch.


