What can be used to make beads with a child. DIY beads: a master class on creating an original and stylish jewelry. From plastic bottles
Yesterday we went to Moscow for a day on business. I ran into my favorite store, where a lot of goods for handicrafts and hobbies are collected. I came in purposefully, the other day my eldest daughter’s (4.5 years old) beads broke, I promised to buy her a string with which we would put everything back together. An idea arose in my head, not only to restore the torn beads, but to make new beads with my own hands together with the children. A good game for developing fine motor skills. In addition, the youngest (3 years old) has been asking for a necklace for a long time. Why buy ready-made ones, when there are so many possibilities now, there was a desire. Let them make these decorations with their own hands, it’s fun and useful. After all, this is the development of fine motor skills of the hands, which is necessary not only for children, but also for adults.
Therefore, I entered the store with a conscious need to buy improvised materials for making children's beads. To be honest, there wasn’t much choice, since I was looking for large beads that would attract children with their shape.
And that's what I bought.
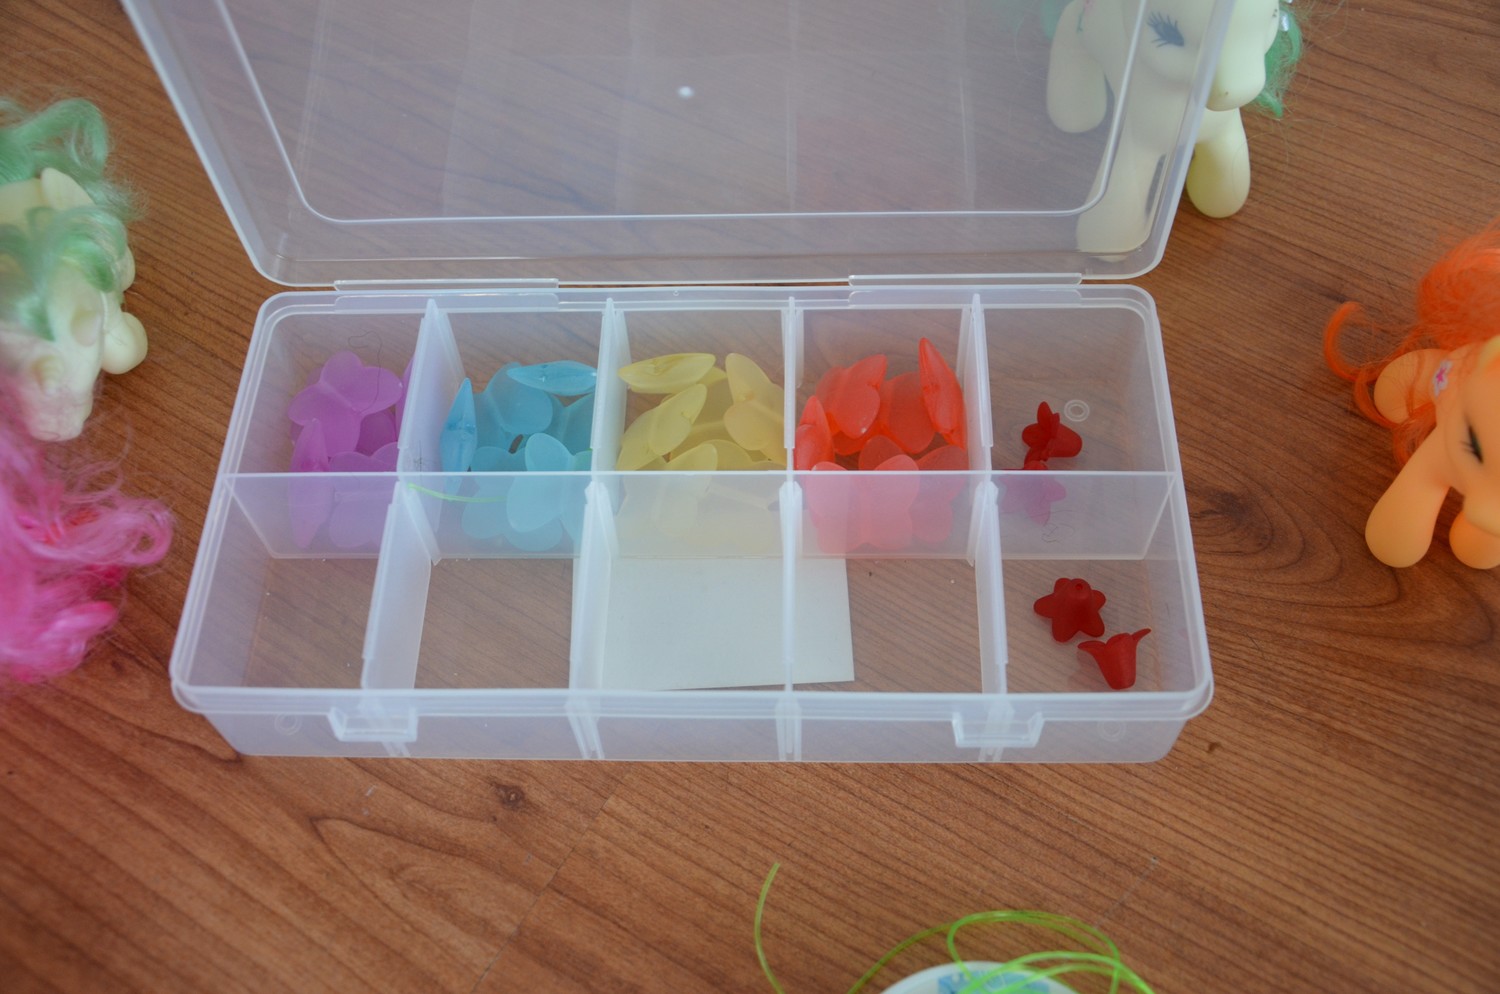
Sets of butterfly beads and bell beads for my eldest daughter.

A set of animal beads for the youngest.

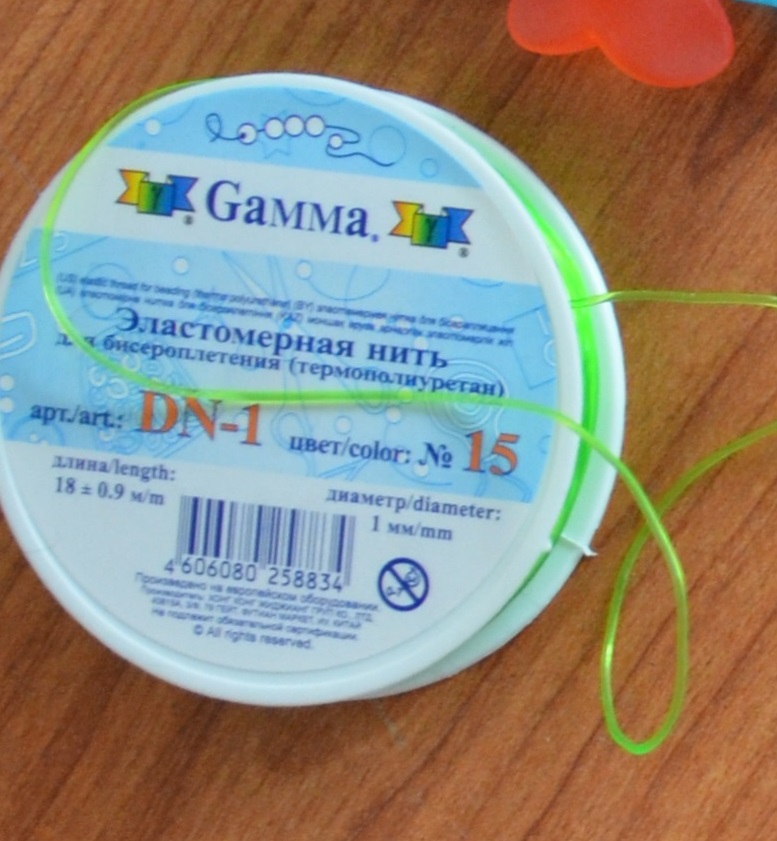
A special rubber band (elastomer thread) for stringing beads, the seller told me which one to choose.
The question of storing all this beauty immediately arose, since bags are not very convenient. And the age of the children does not allow keeping the beads accessible. I had to buy a box to store the beads.
All this cost me about 700 rubles, not cheap. A set of butterflies - 84 rubles, a set of animals for children's beads - 130 rubles, a rope (18 meters) - 56 rubles, a box 250 rubles. Perhaps you can buy it cheaper in online stores, but considering the cost of delivery, it will most likely be the same amount, or maybe not, you’ll have to look.
While we were driving home, I put the beads in a box. They took the girls away from their parents. In the car, Ksyusha immediately noticed a box of beads. And I immediately understood what we would do. I wanted to start right away. It was with great difficulty that I talked myself out of postponing this exciting activity until tomorrow.
And so this morning the three of us sat down together and got to work.
The eldest daughter chose butterflies and bells for her beads. The youngest began collecting beads from animals. Usually we have difficulty finishing what we start, but here the work was in full swing. When I asked, “Let me help,” they answered in unison: “I myself!” We did everything ourselves. I just suggested that you need to alternate colors. The youngest decided in her own way and put it together the way she wanted. I didn’t insist, it’s her beads, let her do as she wants, why disrupt the creative process, everyone has their own. The eldest one precisely alternated all the colors of the butterflies, selected the bells according to the meaning of like or dislike, and all her butterflies had to fly in the same direction

This is what they did.
Images/Beads and bracelet of the eldest daughter (butterflies are still left, perhaps enough for one more children's beads, the bells are over)

Beads for my youngest daughter (there weren’t enough beads for a bracelet, I promised that we’d buy more and she’d make herself a bracelet).

All day the girls did not part with their jewelry, proudly showing them to their dad, brother, and grandmother. With the words: “I did it myself!”

An exciting game to develop fine motor skills in preschool children. In a playful way, it develops perseverance, attentiveness, and imagination. Helps to repeat colors, alternating colors and shapes. And the most important thing is to teach how to finish what you have started and receive moral satisfaction from the result obtained.
History knows cases when gold, people into slavery, expensive furs and even land were given for beads! This is not surprising, because in ancient times beads were endowed with many symbolic and sometimes mystical meanings. They were used as a talisman, personifying luxury, power and wealth, and were used in witchcraft. They were used to treat various diseases and were used as currency.
And only since the Middle Ages, beads acquired the status of independent decoration. Fashionistas and fashionistas began to wear them for celebrations, and after a couple of centuries, beads became an item of daily wardrobe. These days, almost every stylish woman has some beads.

But what if you want to have this beautiful accessory, namely the ones you want are nowhere to be found and perhaps they don’t even exist, or their price still remains equal to a gold bar? There is a solution - make the beads yourself!

Today, there are many resources where you can find diagrams that will show you step-by-step how to make beads with your own hands.


Books, magazines, public pages and websites on the Internet - all this gives scope to the imagination, charges with inspiration and makes it possible to create your own unique design.

What kind of beads can you make?
Beads, pearls, amber, clay, stones, wood, glass, polymer clay, everything is used, even sand! But before you choose the material, you need to decide on the theme of the accessory.

So, shells, stones, glass, and amber are better suited for a marine style. There is nothing better than pearl beads for going out. For everyday outfits, you can use beads made of felt, wood, clay, and beads.

We will look at several options for making beads. Below you will find photo instructions on how to assemble beaded beads.

Beads are a readily available material that is also easy to work with. So, what you will need for production:
- thread (or thin fishing line)
- accessories
- needle
- beads

Also, in addition to beads, you can string practically any additional elements that you want onto the thread.

Measure the thread or fishing line to the desired length (calculate a small distance for attaching the fittings to the ends of the thread). Thread the thread or fishing line into a needle of a suitable size. Please note that not only the eye of the needle should be comparable in size to the thread, but also that the width of the needle and its tip should be narrower than the hole in the beads.

String the beads onto the thread using a needle in the order you want. When all the beads are on the thread, remove the needle and fasten the fittings to the ends of the thread. Or you can tie two threads into one knot (if you have a long thread, or you use a stretching fishing line, or an elastic thread). Your beads are ready!

You can also use a thread with beads strung on it as a working thread for crocheting. In such cases, you get very beautiful openwork beads, collars or necklaces. Experiment and you will be surprised to see what unique jewelry can be made from ordinary beads!


On the Internet you can watch a master class on how to make beaded beads in the form of an openwork necklace.

Polymer clay beads
The good thing about polymer clay is that you can mold it into almost any shape. In addition, as a rule, polymer clay is painted in very bright colors, which will make the beads a noticeable element in your outfit.

You will need:
- polymer clay
- awl (or thick needle, toothpick)
- needle for threading beads
- accessories for securing thread ends
- oven


Make blanks for beads from polymer clay. Use your imagination! Balls, stars, diamonds, squares, hearts - any shape that can be pierced to thread thread into it.


Carefully make a through hole in each workpiece. Try to maintain the originally intended shape, as the clay may become wrinkled during the piercing process. According to the instructions, bake your beads in the oven.

Using the same principle as in “beaded beads”, thread the thread through a needle and string the cooled beads onto it. Secure the ends of the thread with fittings.

Fabric beads
A huge variety of fabrics will allow you to create beads for each of your outfits.

What you will need for production:
- Fabric (desired length of beads doubled; you can use scraps of fabric)
- Thread for sewing on fabric for future beads and a needle
- Foam blanks (can be of any shape, you can use cotton wool or pillow stuffing instead of foam blanks)
- Crochet hook
- Accessories

Measure the length of the desired beads on the fabric. Draw a rectangle from it. Calculate the height based on the workpiece with which the beads will be filled.


If you have a foam blank, then you need to attach it to the edge of your line of the desired length, and bend the fabric so that both of its edges touch, and the blank is inside this “pipe”. Fold the fabric back, measure the height, and add 1 cm to sew the edge.

Cut the measured rectangle. Fold it in half, and departing 1 cm from the edge, sew on a machine or by hand from the wrong side with a regular running stitch, from start to finish, the entire strip of fabric. You should end up with a through “pipe” of fabric.

If you were sewing by hand, then before tying a knot at the end, pull the needle inside the “pipe” and turn it inside out, right side out. If you sewed on a machine, then use a pin.

After you have turned the “pipe” inside out, you can fill it with blanks. Start from the very edge, so it will be more convenient for you to distribute the workpieces.

Inserting one piece from the very edge, sew it on both sides so that the piece is in a separate cell. Continue this way, inserting the blanks using a hook or any other object convenient for you. Sew all the blanks so that they are each in their own cell.


Insert and sew the last piece. Secure the ends with hardware. Designer beads are ready!

Beads, like any accessory, are influenced by fashion. Therefore, you can create and wear beads from different materials, because some of them will always be in trend.

DIY photo of beads


We're finally looking forward to our vacation. And there, as they say, sun, sea, beach, etc. But not for everyone. After all, the sea is not only a good place to soak up the sun, but also to spend time productively. For example, collect shells with the children to make crafts: do-it-yourself beads for kindergarten.
Any shells will do. Probably everyone remembers the belief that if you find a beautiful shell or pebble with a hole at sea, you can put it on a chain and it will be your talisman. You will always be lucky with him. So we collected several of these talismans with the children, and of course we also got a lot of identical and beautiful shells. We will make beautiful sea beads, however, they will be universal. Both mother and daughter can wear them.
Step-by-step instruction
And so, let's get to work. We will need:
- shells
- beads
- "Iris" threads
- hook

First, we think about the pattern, what you want to see on your beads, in what order your beads and shells will go. Next we put them on a thread.

We use our shell talismans as the middle.


So that the core is clearly visible, we tie each shell with a crochet hook using regular air loops, passing the hook into the hole of the shell.

We make the last loop large and pass the remaining chain of beads and shells into this loop and tighten it. Thus, we fix our loops, they will not come undone.

This is what our middle looks like. Now each shell is separate and does not crawl on top of each other.

Now we will tie a loop for the fastener. We choose the length of the loop such that it would be enough to wrap the shell around the clasp.

I cast on 20 chain stitches and knitted a single crochet into each stitch. This will make the loop tighter and make it easier to find the clasp.

We tie the bead clasp with air loops. We pass the thread through the last loop, tighten it and cut off the unnecessary tail of the thread.

Now our beads are ready, you can put them on and go to the beach.


Children love these beads and they suit them.

But mom can wear them too. It’s just that shell beads, it seems to me, suit everyone. Yes, and they are very easy to make.
Happy creativity!

Tatyana Bezmenova
In my last publication I wrote about how we did beads for girls from a shell. In general I really like beads, they perfectly highlight a woman’s outfit and make her more elegant. I have a huge number of different beads in my arsenal, and I buy them with great pleasure. I've got ceremonial beads, but there are everyday ones, there are catchy, bright ones, and there are modest ones, big and small, expensive and not very expensive, and also, as I call them "summer", in a word, a huge selection for any outfit. Beads, in my opinion, every woman should have, but you need to love them and be able to wear them. I think I have one and the other quality. Wherever I am, I buy beads, but I buy not only in stores, I like to make these wonderful products myself.
And today I want to offer my version "summer" beads Making such beads will not take a lot of time and money, but you will always look advantageous and know that your product is in a single copy.
To make such beads we will be needed:
Sewing machine;
Pieces fabrics(I prefer chiffon);
Modeling dough or mass for children's creativity.

I thought for a long time about what to make beads from. You can, of course, make it from cotton wool, padding polyester, or foil, but I came up with the idea of making beads from mass for children’s creativity, because it’s cheap, you can make beads of any size and shape, which can’t always be found in the store, the surface of the beads is very smooth , and dries in air and becomes very durable. Even children can easily cope with this task, and rolling the balls will give them great pleasure. So you can make these beads in kindergarten with children.
So let's get started. Make beads of the desired size and leave to harden. From cut fabric into strips, width depending on what kind of beads you will make, length - whatever you need, fold it in half lengthwise and sew it on a sewing machine, do not sew it on one side, leave a space, we will push the beads through it. Next, use a pencil to turn it inside out. For fixing balls textile twist and make a knot. When all the beads are threaded, we sew this place.


All! The product is ready, all you have to do is admire it and wear it with great pleasure!

Publications on the topic:
Neck jewelry is something that women all over the world wear. Beads, necklaces and bracelets are probably the most ancient jewelry. It doesn't matter how much.
Goal: to create a doll that is safe for health, brings joy and peace of mind, and fosters love for the small Motherland. Tasks:.
As children, we all loved to play with various dolls and games. I want to tell you how you can make a puppet theater with your own hands. Of course now.
Paper rosette for March 8th The holiday is approaching - International Women's Day on March 8th! And I want to do something with my own hands, something.
In this master class I will tell you how to make a chest out of a box with your own hands. I saw a lot of different options and decided to try it myself. What.
Good afternoon, dear colleagues! I want to show what interesting things we do with our students. For the holiday of March 8, the guys and I.
Master Class. DIY willow. Hello, dear colleagues, today I would like to present to your attention a master class on manufacturing.
Learn how to make beads with your own hands from different materials - wool, beads, leather, paper, and even T-shirts. And to help you - master classes and 53 photographs!
How to make beads with your own hands from wool?

The felting technique is interesting and amazing. Look what a beautiful decoration you can make with it. These beads look like rolls. Let others wonder what these accessories are made of, but don’t tell them the secret right away.
At first, only you will know what you needed to make them:
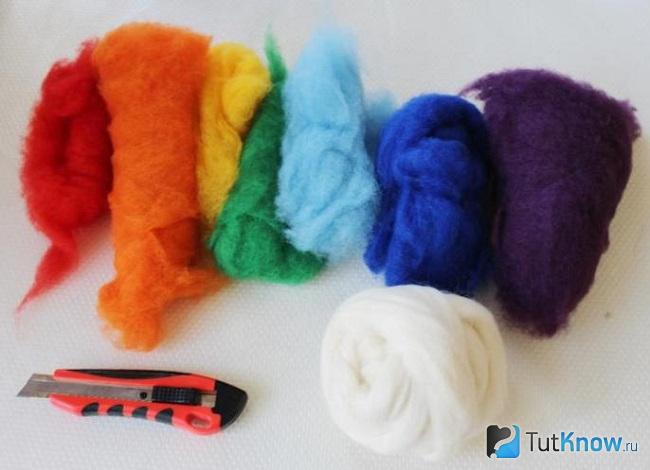
- wool of various shades;
- bubble wrap;
- rubber mat;
- stationery knife;
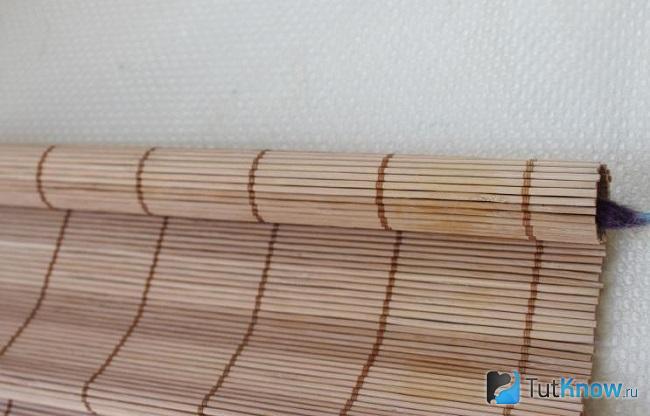
- bamboo mat;
- small towel;
- mesh
The presented technique allows you not to throw away the pieces of wool left over from needlework, but to put them to use.
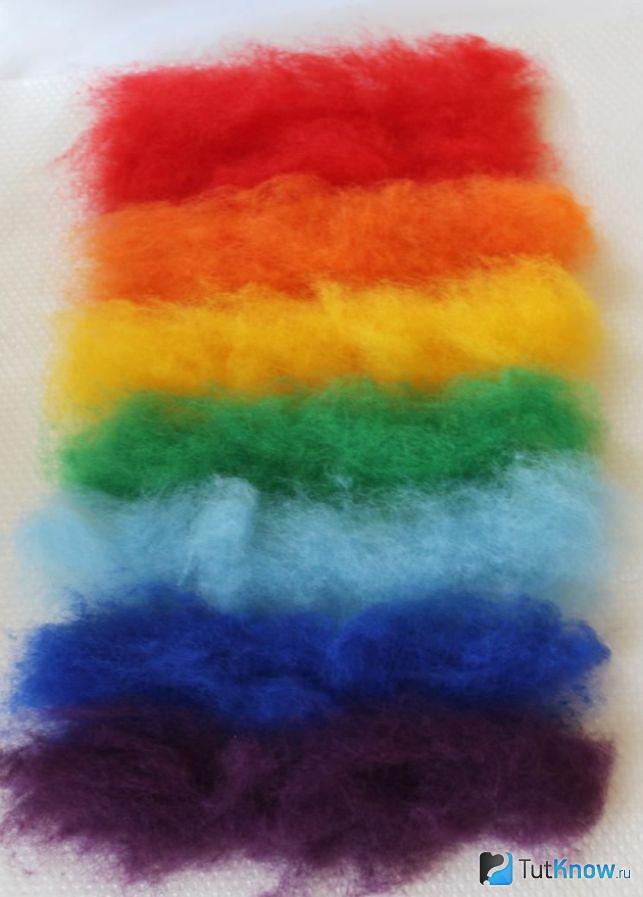
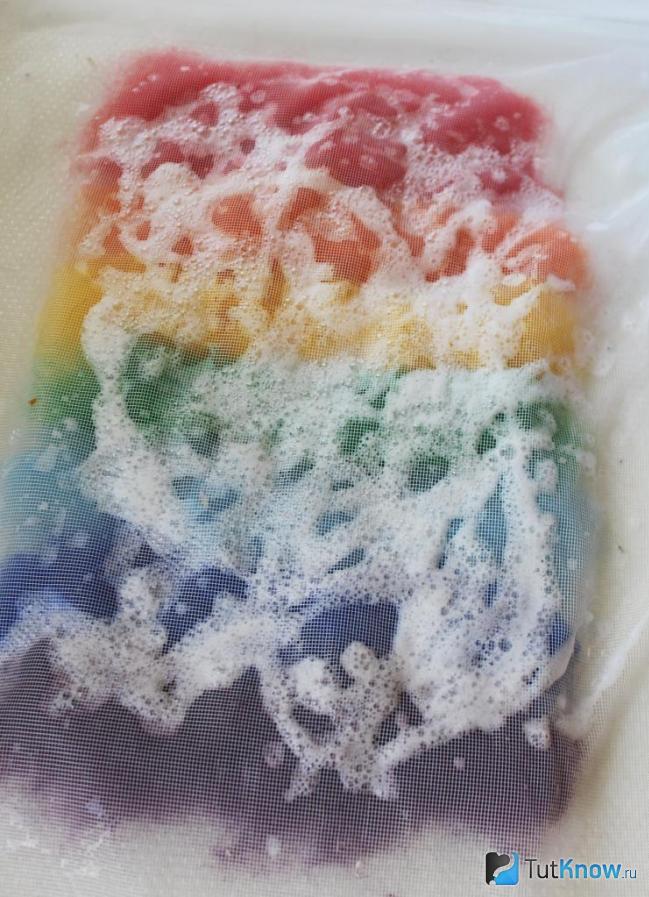
Pinch off small strands and arrange them evenly in one row. Choose according to color scheme. For example, first lay lilac, blue, light blue wool, then green, yellow, orange, red.
This blank canvas should have a size of 30x22cm.
The red stripe will be on the edge, it is a little wider than the rest, and why, you will learn about this a little later. In the meantime, we continue to make beads - a decoration that looks extraordinary.
Cover the resulting workpiece with a net, sprinkle with the prepared soap solution, and rub with your hands.
Place a thin layer of white wool on top, slightly backing from the edge. This will help separate the layers. For this, you can use not only this, but also brown and black wool.
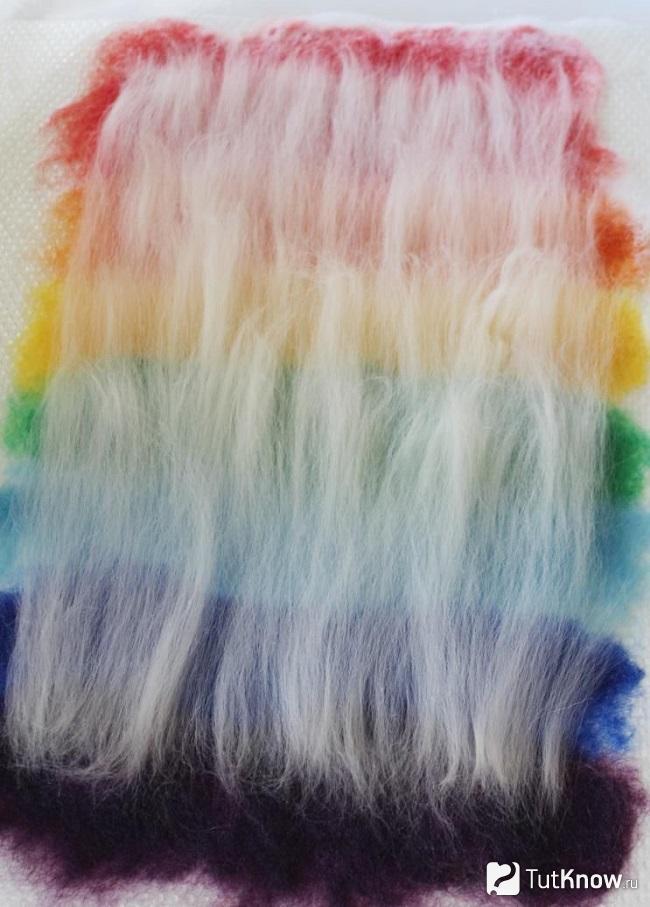
Cover the resulting workpiece with a mesh, spray it with water from a spray bottle, and lightly press it with your hands. Cover with bubble wrap and wipe through the mesh again so that the layers adhere well to each other.
Wrap the resulting fabric with a roll.
It's time to reveal the secret of why we didn't cover the red wool with white. When you rolled the canvas into a roll, a figure similar to a comma formed inside it.
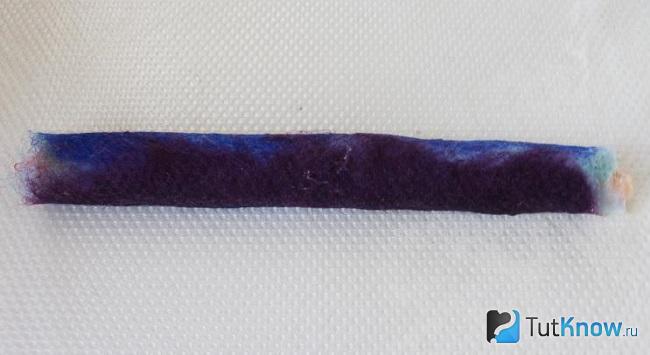
Now you need to wrap the resulting “sausage” in perforated film. Be patient, as this workpiece needs to be rolled for about 5 minutes. Then all layers will adhere well to each other.
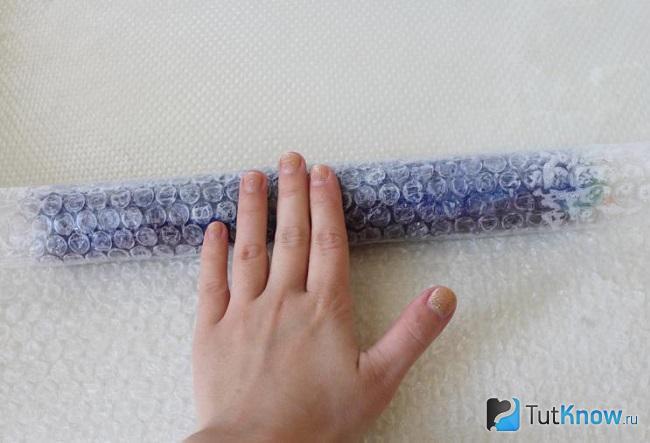
Remove the film, now you need to roll this workpiece on a rubber mat. Don't forget to seal the edges too. They should turn out cone-shaped. To do this, these parts need to be lightly pinched during operation.

Wrap the resulting sausage in a terry towel, continue to compact it, rolling it in the towel. To make it even denser, wrap it in a mat and roll it for another half hour.
Now you can take out this workpiece, rinse it well in warm water, then leave it until completely dry.
To avoid a musty smell, you need to dry the felt in a warm, ventilated place. It is advisable to first thoroughly blot the workpiece with a towel.
Once this part is completely dry, the fun begins. Take a stationery knife with a new sharp blade and chop this workpiece into circles 1 cm thick.
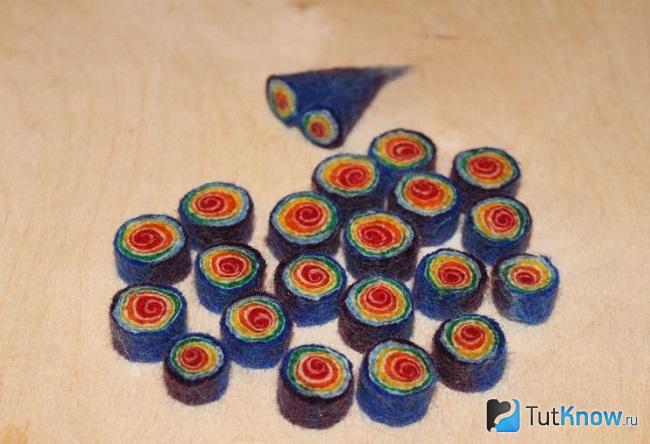
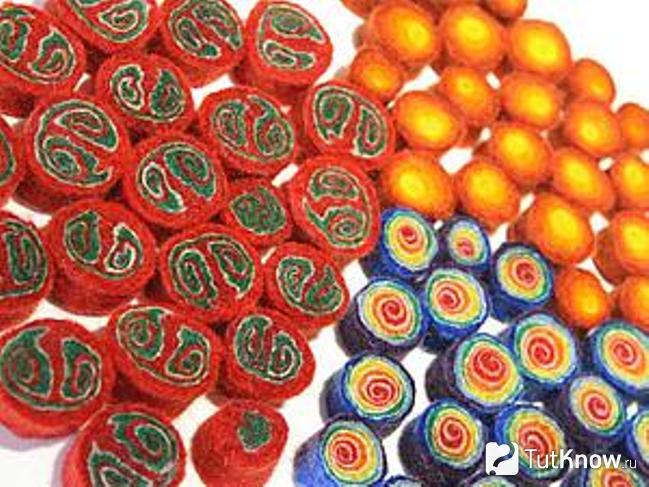
These are the beautiful rolls you will get. It’s good that some of them are of different sizes; when assembling the product, you can place larger elements in the center and smaller ones at the edges.
If you liked creating bead jewelry, then you can look at another interesting way that will allow you to get a different color scheme.
To do this you will need yellow, orange and red wool.
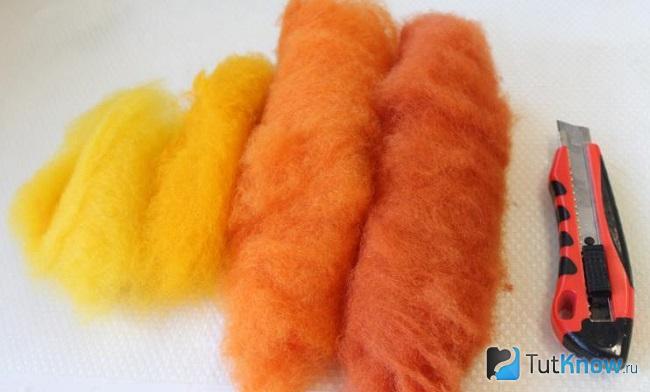
Place a piece of this wool on the work surface. Moisten with soapy water and place bubble wrap on top. Apply the workpiece and wrap it with a roll. Then proceed the same way as in the first master class.
You can experiment with colors and make beads from wool of different textures and colors.
How to make beaded beads?
The next master class will help you create such an airy decoration.

To make a necklace you will need:
- fishing line;
- beads;
- hook;
- scissors;
- clasp.
- The decoration is very simple to make. First you need to string the beads onto the fishing line. Then the resulting “thread” must be knitted, making a chain of air loops. But the loops are not the same. Some consist of 3-4 beads, others are empty (no beads) and contain only a fragment of fishing line.
- After you knit the entire fragment, finish decorating this workpiece by knitting 5 loops of fishing line at the end. Finish securing this piece by tying a knot here.
- In the same way, perform at least 10 elements, making each new component of the beads 5 mm longer than the previous one. All that remains is to thread all the ends of the fishing lines into one fastener and secure them here.

Taking a thin wire, you need to string beads onto it and form them into the frame of a flower, consisting of a core and four petals. Then in the center of each petal you need to secure a larger bead.
Make several of these blanks and fasten them together. This is the first row of necklaces. To create the second one, you need to make hanging loops from small and large beads. Finish the process by attaching the clasp.
The following bead weaving pattern will help you create similar ones. See how to make flowers from six beads by stringing them on wire. Then twist it and put the same number of beads on here.

Then a third is added to these two petals and so on. In total, this flower consists of six petals and a core. There are several elements you need to complete to create a necklace that fits you. Finally, beads are used to create columns on both sides. A fastener is put on the ends of the wire or fishing line and secured.
But what other beaded beads can you make by taking elements of two colors.

Such neck jewelry can be created from the most unexpected things. Proof of this is the next master class.
How to make beads with your own hands from a T-shirt?
Such knitted items are simply a treasure trove of useful ideas. To make beads, take:
- T-shirt;
- metal ring;
- threads;
- a needle.

If you need to lengthen the elements, you need to connect the ends of two strips and sew them by hand or on a sewing machine.
Let's get started with some interesting work. Form a loop from each strip and attach it to the ring. You need to braid it all with these elements so that the ring is not visible. To do this, attach the strips close to each other.
See what you get - front and back views.

If the ring is in front, then throw the ends of the ribbons over your shoulder and arrange them here, weaving two braids. Tie the remaining ribbons and secure with a hair clip.
You can use not only a T-shirt, but also other things that have gone out of fashion and unnecessarily take up space in the closet. Cut them into strips too and tie them to the ring.

Here's how to make beads from a T-shirt so that they are very elegant. Also cut it into strips. String several large beads onto each one. Sew the strips so that the seam is at the back. Cover it with a piece cut out from a T-shirt. The photo demonstrates how to make such beads.
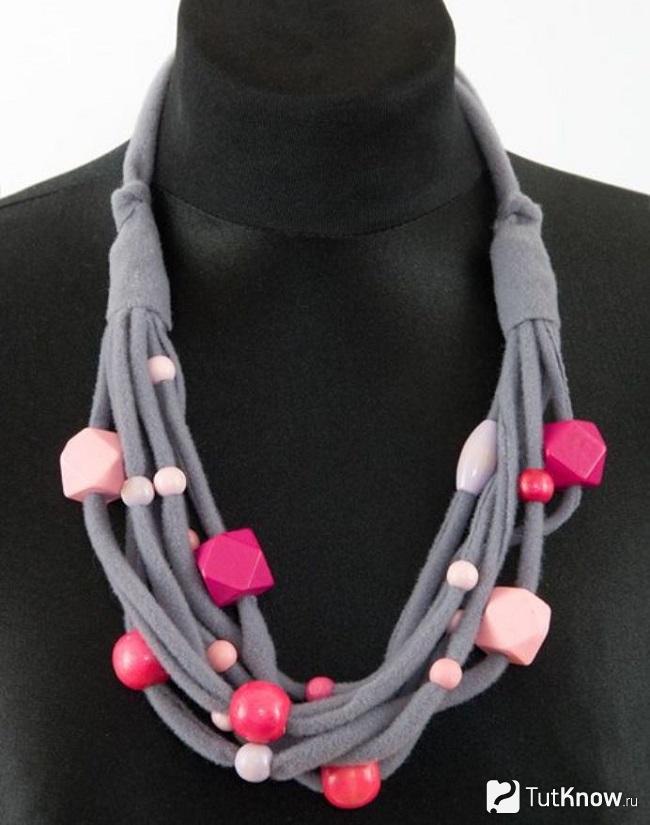
They can be made from an unnecessary thing, designing it in a certain way.
Immediately cut out the triangle with the ties or sew them on later. All that remains is to sew on beads or glue artificial stones and you can try on the jewelry. Do not throw away the pieces of leather left over from needlework; use this material instead of the base.
How to make a necklace from various materials - master class
An original decoration can be created from the most unexpected materials.
From metal circles

To make the next necklace you will need:
- metal mugs;
- ribbon;
- scissors.

Shade the ribbon. Thread the second end as shown in the following photo to secure these two parts of the necklace.

Using this technology, attach the remaining elements, making beads to your size.

All that remains is to attach the clasp and try on the new jewelry. If it is not a necklace, but beads of a sufficient size, then you can not make a clasp, but put them on over your head.
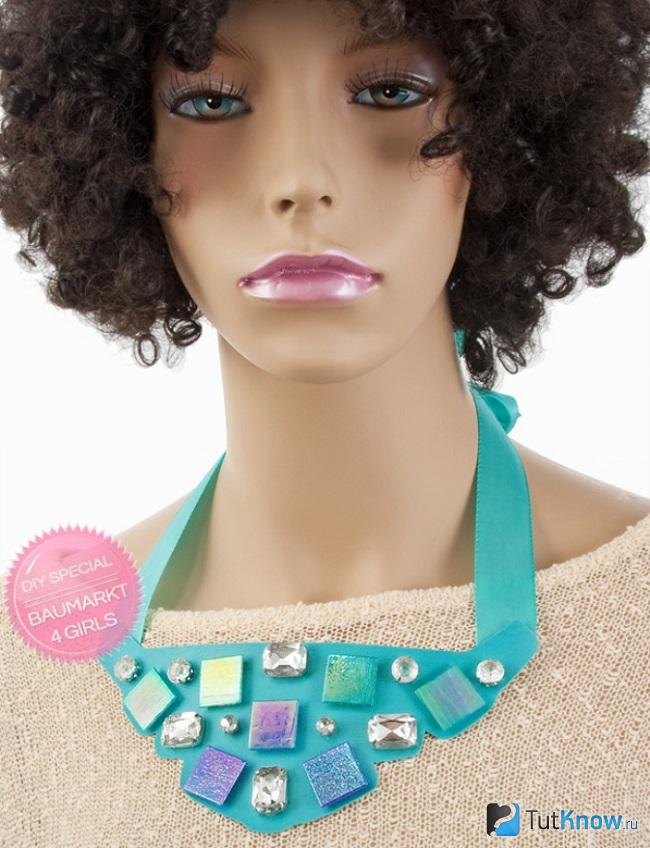
Made of suede and rhinestones
The master class will show and tell you how to make another necklace. It is made using an interesting mosaic technique.

To create one, take:
- broken brooches, rhinestones;
- suede;
- fishing line;
- fabric for lining;
- interlining;
- ribbon to match the fabric;
- threads

Cut out a blank from suede. Place the remaining jewelry and other decorations you have on the front side. First, sew on the largest ones using fishing line and thread, then place the smaller ones between them, and also secure them.

Trim the excess suede with nail scissors, leaving 3mm of this material at the edges.

Glue interlining to the wrong side of the lining fabric, then glue this part to the main one.

Insert ribbon on one and the other side. Sew them on and sew the edges of the product with small stitches.

If you don’t have enough beads to decorate your necklace, then you can paint plastic elements, buttons, shells with hairspray and use them.

From plastic bottles
This is a very interesting option for making jewelry from unnecessary containers.

To make this type of decoration you will need:
- plastic bottles, their caps;
- metal knitting needles;
- scissors;
- buttons;
- hole puncher;
- dye;
- embroidery threads;
- construction hair dryer;
- drill.
Use acrylic paint designed for plastic. Apply it in several layers with a cosmetic sponge.
Cut the bottom of plastic bottles and give these parts the shape of petals. Bring the blanks to a hair dryer and heat them until they take the shape of flowers. If you do not have such a device, hold the plastic parts over the flame for a few seconds. Then paint them the color you want.

Cut leaves from bottles and paint them green. Make a hole on each such element with a hole punch or awl.

Make daisies from the white caps by cutting out their petals with a knife. Hold them near the turned on hair dryer so that the petals bend and take the desired shape. Using a drill, make a hole in the center of each daisy. Paint the cores yellow.

String flowers from plastic bottles, daisies from caps and leaves from bottles onto metal knitting needles so that you get a beautiful necklace or beads.

From paper
You can create very beautiful beads from this cheap material.

To do this, see the following diagram. As you can see, having cut the strips of paper in a certain way, you then need to fold them, and you will get beads of various shapes.

For the first type of such blanks, you need to cut out an elongated triangle, for the second, this triangle must be beveled. For the third, a strip with a narrowed end is cut out. The fourth is a wide strip, the 5th is narrow, the 6th is even narrower. Cut out the seventh and eighth elements in an interesting way. First you need to make a fairly wide strip. For the seventh bead, stepping back a little from the top, you need to make a horizontal slot here. Next, an oblique line is cut from the left point to the left, and from the right point to the right.
Let's look at an example of how to make paper beads. Cut the leaf into long, narrow triangles. Take the first one, wrap it around a wooden stick or a toothpick. Remove from it, you will get something like this.

You need to make several of them.

Now connect the beads to make an original necklace. These skills will come in handy when you make another unusual piece of jewelry.
From pins

Make beads from paper strips in the same way. But don’t close them yet, but wind each strip directly onto a specific pin. To make the necklace double-sided, wrap a strip of paper on each side of one pin.
Now you need to string the pins onto a strong thread, thin elastic band or soft wire and make a necklace.
From laces
The next decoration will be no less original.
To make it you will need:
- laces of different colors;
- needle and thread;
- beads;
- glass pebbles;
- glue.
Sew the laces together to create a fairly wide strip of necklace. Glue the pebbles, sew on the clasp.
These are the beads you can make with your own hands from the most ordinary materials, but the jewelry will turn out to be extraordinary. If you are interested in this topic, see how to make beads with your own hands from fabric:
Here's how to make a necklace from crystals and beads:


