Cartoons are a smart approach. Exercises for teaching children using the Montessori method Special educational environment
Italian educator Maria Montessori believed that this requires giving children the opportunity to choose in the first years of life, allowing them to develop with minimal interference in a special environment. A key principle in Montessori pedagogy can be described as: “Help me do it myself.” According to various estimates, in the modern world there are from 3 to 10 thousand schools whose work is based on Montessori methods. Let's talk about why this method of education in conditions of creative freedom is attractive and what its basic principles are.
Maria Montessori, who lived in Italy at the turn of the 19th and 20th centuries, was a doctor and teacher. The impetus for creating her own educational system was her work in a children's clinic. There, Montessori, observing, came to the conclusion that the child needs a special environment that will encourage him to learn and develop, independently, without coercion. An adult should only be a guide on this path, who will teach you how to use this environment and develop at your own pace. In Russia, the first preschool institutions based on the Montessori system appeared even before the October Revolution, but did not operate for long. The return of the technique to our country occurred already in post-Soviet times. All this time, the basic principles of this system remained unshakable.
Special educational environment
In order for a child to develop as productively as possible, you need to create a special environment for him, taking into account his interests and needs. The Montessori environment consists of various teaching materials - animal figures, cubes, musical instruments, teaching aids, and ordinary objects corresponding to certain zones. Each zone is responsible for important skills. Moving between them, the baby acquires various everyday skills, learns to explore the world through the senses and realize the consequences of his actions, becomes familiar with letters and numbers, expands his vocabulary and understands the essence of arithmetic operations. The child develops, expresses himself creatively, and gains ideas about how the world works.
An important requirement for any of the zones is that everything in it is accessible to the child. He should have the opportunity to reach everything that interests him and start working.
Freedom and discipline
A teacher in a Montessori kindergarten never tells children what they will do today. He can stimulate their interest in something, but not force it. The child independently chooses an activity for himself, learns to listen to himself and make a choice. The freedom given to him allows him to develop initiative. At the same time, they explain to the kids: your freedom ends where the freedom of another begins. Children follow the accepted rules: they put away their toys, move quietly around the classroom, and try not to disturb each other. This is discipline that does not need to be called upon, since it is formed from within, without coercion.
Independence
Everything that a child can do on his own, he does on his own. An adult can give him exactly as much help as the baby himself needs. As Montessori herself believed, 2-4 years is the golden age for instilling neatness in a child. In a Montessori garden, a child is given the opportunity to learn the basics: fastening buttons, cleaning shoes, ironing clothes. He prepares his workspace on his own: he puts an oilcloth on the table if he wants to paint, brings paints, fills a glass with water and cleans up after himself. This is how determination is instilled in the child, and this is how he gets the opportunity to feel like an adult.

Non-judgmental
The teacher does not evaluate either the child or what he does, and does not compare him with others. The reward for a job well done for the child is the joy of what he accomplished. The punishment for pranks is relative isolation from other children: the child is simply seated at another table, without being disadvantaged in any way. The child learns to evaluate himself independently, to be independent of external assessments, to do something well not for the sake of a reward, but simply because he likes it. This is important for self-confidence.
Different ages
Maria Montessori believed that grouping children by age for some activity was unnatural and unproductive. In one group there are children of different ages, from 3 to 7 years old. Initially, Montessori groups were of different ages for children from 3 to 7 years old. Now, according to International Standards for children under 7 years of age, the following division has been adopted. In infant groups (Nido, Infant) classes are held for children from 2 to 14-16 months, in Toddler groups - for children from 14-16 months to 3 years, Casa dei Bambini - from 2 years 8 months to 6 years.
The younger ones follow the example of the older ones, and they recognize themselves as leaders. Everyone learns together to interact with each other, show patience and flexibility, ask for help and give it. Such interpersonal communication skills are invaluable for the development of a child’s emotional sphere. In addition, children can develop at their own pace, taking into account their own capabilities: in a mixed-age group, a five-year-old child who has not yet mastered it will not feel behind. What happens to a child who studies without coercion, without comparing him to others? He discovers reading, writing, arithmetic himself, controls the educational process himself and learns with pleasure. After all, all children have a cognitive interest that is so important to maintain.
The theoretical side of Montessori pedagogy looks very attractive. What fruits does this system produce in practice? Lada Lazareva, head of the Opportunity Center “Nash Lad”, shares her opinion.

Indeed, as a result of well-organized classes in a special Montessori environment, the child independently, at his own pace, improves gross and fine motor skills, masters language, develops sensory perception, attention, memory and imagination. He learns cause-and-effect relationships, self-discipline, self-care, and other real life skills. Thanks to Montessori classes, the child can keep himself busy, learn to understand himself and gain knowledge based on his own experience, developing the ability to self-learn.
Today in Russia, many organizations that claim to offer classes in the Montessori system do not comply with International standards. They often do not provide for physical exercises, there is no place for music, creativity, and materials for activities with children are limited to pouring cereals and pouring water. If the teacher does not have sufficient experience, then active children in the group may have difficulty following the rules. And children who are prone to fantasizing may find it boring. Without the sensitive work of an adult, a Montessori child concentrates on himself and is not drawn to communication. For withdrawn children, mastering the material on their own generally risks alienation from the team. In addition, the position of an inexperienced teacher as an assistant discourages the child from perceiving an adult as an authoritative person. It is also worth noting that attending accredited Montessori groups is quite expensive. Therefore, some parents try to create a Montessori environment at home. After all, many exercises can be easily reproduced at home. However, to obtain the educational results stated above, a competently created environment and a qualified specialist are required.
I remember my childhood relationship with cartoons. I remember with what trepidation I waited for them. In the program schedule, I circled them, and the day off was filled with these expectations. And now, finally, 15 minutes of happiness - and that’s it, end, wait until the next day.
I wonder if I would even remember these cartoons if I could watch them all day long? But I remember with what rapture I listened to records with fairy tales. A whole fairy-tale world was born in my head, so many unforgettable images flashed before my eyes that not a single cartoonist would have drawn such a thing.
I don’t know who was luckier, me or my child, who could watch cartoons for hours, repeating: turn it on again, again, again...
I am for a reasonable approach, including in relation to cartoons. 
There are different cartoons: good and not so good. We will assume that you have chosen a good cartoon: with good characters, with instructive stories, without scenes of violence and bloodshed.
Pay attention to the main character and his behavior pattern, if he seems to be kind, but constantly runs around and does minor mischief and everything somehow doesn’t work out well for him, then keep in mind that the child will copy such behavior patterns.
No matter how good the content of the cartoon is, but the danger for a small child lies more in viewing time. This is a very big strain on the child’s eyes, especially since children always try to sit closer.
 Great emotional load on the child’s psyche, which can lead to emotional overload, and manifest itself in poor sleep, increased sensitivity to little things, and moodiness. Thus, the conclusion suggests itself simple and unambiguous - control viewing time cartoons, and the smaller the child, the tighter the control should be, and the shorter the viewing time.
The next danger for a child (and I would say the biggest) is that the child gets used to consuming information without analysis, accepting only ready-made facts. There are no personal discoveries here, just sit and chew what you've been given.
During viewing, the visual channel of perception is actively working, and accordingly, with such a load on the visual channel, all the others, figuratively speaking, will “fall off” as unnecessary.
Therefore, it is very important not to abuse this method of obtaining information. And in order for the child to begin to analyze what he saw, the participation of an adult is necessary - an explanation of some points, a discussion after viewing.
Now there are a huge number of educational cartoons, quite good content, with positive characters. Is there a need to show them to children?
As an independent educational element, in my opinion, such views are not particularly useful.  Yes, the child receives a flow of information due to his absorbent mind. But, it is important to understand that a child should receive his first discoveries through experience, trying and exploring. For a child, the drawn world is an abstraction. And the child’s cognition moves from the concrete to the abstract. That is, first the real world - trying, getting acquainted, experimenting, and then the abstract one. In this sequence, an educational cartoon can be a good addition to the experience already lived.
It is also a good practice to watch cartoons based on familiar favorite fairy tales, which the child has already become acquainted with through books. Thus, the picture you see will complement the already formed image.
Of course, a very good prospect for busy parents - they turned on a cartoon, and the child is not heard or seen, and the parents can take a breath, and even at this time the child learns something - just a dream. I classify this technique as one of the “forbidden” techniques, which can be used in rare cases, for example, on the road, at the airport, or even when there is really no strength left. But as a regular practice, it’s not worth it.
Children get hooked on cartoons very quickly and beg for them all the time. Because this is the easiest, most effortless way to entertain yourself. Of course, with an older child, you can already agree on a viewing time, but with a very young child it is very difficult to do this. Although it is still easy to switch a small child to something else, but, again, this requires some effort on the part of the parents.
Considering this fact, do not rush to introduce your child to this miracle; believe me, he will not lose so much. Focus on listening to audio fairy tales - this is a great alternative to cartoons. Moreover, it develops auditory perception and develops the child’s imagination and imagination very well.
 Now there are a lot of wonderful audio fairy tales based on cartoons and wonderful musical poems by children's poets S. Mikhalkov, B. Zakhoder, A. Barto, E. Blagina, K. Chukovsky and many others. Arranged with lively, cheerful music, children really like them. Plus, focus on books with good illustrations.
In preschool age, this is the best multimedia accent that will instill in your child the ability to listen and draw pictures in his imagination. And he will be able to watch all the good cartoons later, and will watch them not just as changing pictures, but with an understanding of the plot, the mood of the characters and draw independent conclusions about what he saw.
While the child is small, lay a solid foundation in him, and this is the ability to listen, analyze, imagine, filter what he sees, which will certainly be useful to him much more in life than simply perceiving the flow of information, superficial knowledge that abounds in our lives.
If you want to be the first to know about blog news, subscribe to updates!
On our website you can purchase the product you are interested in using one of the payment methods:

Payment security and confidentiality
When you select this form of payment for your order on the website, you will be automatically redirected to the payment form of the PayU processing center to enter your bank card information.
All data entered by you on the payment form of the PayU processing center is fully protected in accordance with the requirements of the PCI DSS security standard. We receive information only about the payment you made.
A payment authorization message will be sent to the email address you specified when making the payment.
Immediately after making the payment, you will be redirected back to our website. Information about your payment can reach us from 5 seconds to several minutes. If in your opinion there has been a delay in order processing, you need to contact the company office by phone 8 800 500-65-37
Buyer's personal information.
When submitting an Application on the Website, the Client provides the following information: Last name, First name, email address, phone number, delivery address.
The Seller uses the information to fulfill its obligations to the Client. The Seller undertakes not to disclose information received from the Client. It is not considered a violation for the Seller to provide information to agents and third parties acting on the basis of an agreement with the Seller to fulfill obligations to the Client.
There is no breach of obligation to disclose information in accordance with reasonable and applicable legal requirements. The Seller is not responsible for the information provided by the Client on the Site in a publicly accessible form.
After payment, log into your “Personal Account” and select “My Courses”
There you will find all the products that you have purchased on our website website
If you have not received your product within an hour after payment, you must write to the support service info@site
Refund Policy
The Customer has the right to refuse to provide paid Services and demand a refund in the following cases:
1. For a paid electronic product (recording of a webinar, seminar, training, training course, templates and supporting materials available for download). A request for a refund must be sent from the email address from which the order was made to the Contractor's support service within 7 (seven) days from the date of payment. After the specified time, claims will not be accepted and funds will not be returned. When submitting an application for a refund, it is necessary to provide a copy of an identification document (passport).
2. For a seminar or consultation paid for and attended by him. A request for a refund must be sent from the email address from which the Customer registered for the seminar to the Contractor’s support service before 14:00 Moscow time on the day following the day the Service was provided. After the specified time, claims will not be accepted and funds will not be returned. When submitting an application for a refund, it is necessary to provide a copy of an identification document (passport).
Raising a harmonious personality begins in early childhood - everyone has heard about it. But in this regard, parents face the biggest problem of all - the problem of choice. And for starters, it concerns the child’s teaching methods. Despite the presence of a sufficient number of different techniques and recommendations, only a few of them are the most popular. In particular, the early learning system according to Maria Montessori, which can be implemented at home.
The essence of Maria Montessori's method
Maria Montessori is a doctor, teacher, scientist and author of a famous method of teaching children. She was the first woman in Italy to receive a medical degree and worked with mentally retarded children. The program she developed at the very beginning of the twentieth century was based on the idea of self-education of a child. And imagine the surprise of her colleagues when children with developmental delays studying using her method took first place in subject Olympiads just a year after the start of classes, showing deeper knowledge than their normal peers.

The basis of the Montessori approach is that a child, exploring the world, should be happy
After such success, Montessori earned worldwide recognition, and its system began to be used to teach ordinary children.
When introducing Maria Montessori's method into life, adults need to understand what the baby is interested in, create conditions for the most complete development and explain how the toddler can learn more. Classes are held in special zones (we’ll talk about their configuration a little later), developing certain intellectual and emotional components of the personality.
This is interesting! Members of the British royal family Henry and William were trained using the Montessori method. Also among the outstanding “graduates” of the system: writer Gabriel Garcia Marquez, founder of the Google search engine Sergey Brin, ideologist of the wiki concept, creator of Wikipedia Jimmy Wales, as well as founder of the Internet company Amazon.com and owner of The Washington Post publishing house Jeff Bezos.
Components and principles of the system
Maria Montessori developed 12 basic principles on which her entire teaching system is based.
- Children learn from what surrounds them.
- If a child is often criticized, he learns to judge.
- If a child is often praised, he learns to evaluate.
- If a child is often shown hostility, he learns to fight.
- If you are honest with a child, he learns justice.
- If a child is often ridiculed, he learns to be timid.
- If a child lives with a sense of security, he learns to believe.
- If a child is often shamed, he learns to feel guilty.
- If a child is often approved of, he learns to treat himself well.
- If a child is often lenient, he learns to be patient.
- If a child is often encouraged, he learns self-confidence.
- If a child lives in an atmosphere of friendship and feels needed, he learns to find love in this world.

According to Montessori, children should gain maximum knowledge from practice
Montessori education involves teaching children from birth until school age. It is based on three main components.
Components of the Montessori program - table
| Components of the Montessori method | Description |
| The child and his receptivity to learning | You need to clearly understand which perception is closer at a particular age.
|
| Environment | At each specific stage of development, the baby should be surrounded by things that he understands. The task of adults is to bring this accessibility to life. So, for example, a child will quickly learn to dress himself if there is a low chair next to his crib, on which his mother hangs clothes for tomorrow in the evening. |
| Teacher | The baby must become his own teacher. The role of adults in teaching using this method is observation. That is, the child’s message is not that the parents do something for him or with him, but that they are ready to explain everything that the little one does not understand. That is why the motto of the Montessori method is: “Help me do it myself.” |
Comparison with other development methods: Zaitsev, Nikitin, Doman, Lupan
As already noted, these days there are quite a few early childhood education systems. Their differences mainly concern:
- required material;
- study areas;
- adult roles.
Comparison of methods - table
| Methodology for comparison | Differences |
| Zaitseva | Zaitsev's methods involve a game form of work. Meanwhile, the Montessori system is not a game as such, that is, you don’t have to say: “Now we’ll play.” This is ordinary life, but organized according to certain rules. Thus, you need more material for classes than a set of cubes and tables. |
| Glen Doman | In Glen Doman's method, learning takes place using cards. In it, unlike Montessori and Zaitsev, there is no impact on the sense of touch, and this sense is the leading source of perception in children under 5 years of age. |
| Nikitins | The Nikitin games are close to the Montessori system, since both methods define the parent as an older comrade, and not a person giving instructions and checking their implementation. True, the Nikitin system also includes the active hardening of children, but neither Zaitsev, nor Doman, nor Montessori touch on physical development in such a context. |
| Cecil Lupan | Cessil Lupan's method, like Lyudmila Danilova's system, is aimed at ensuring that in the first year of life a child should learn as much as possible. Maria Montessori, on the contrary, suggested dosing out new things in equal portions, but the baby learns the unknown all the time. |
Advantages and disadvantages of the system
Practitioners and parents with experience call the advantages of the Montessori method:
- independent development of the baby (without the guidance of an adult, but under his supervision);
- individual pace of personal growth of the toddler (all age limits for certain types of activity are given approximately);
- convenience of the form (you don’t have to set aside special time for classes, working according to the system is everyday life);
- formation in the child of such important qualities as self-discipline, organization, rationality, etc.

To implement the methodology, it is absolutely not necessary to purchase expensive manuals and materials.
Miscalculations in the Montessori method include:
- insufficient attention to the development of the creative and emotional components of the personality, an inflection towards intelligence, analytical, logical thinking;
- the absence of role-playing games, since, according to the author of the development system, they distract the child;
- an omission associated with the correspondence of tasks to the baby’s temperament (for example, if the child is quiet, calm, that is, phlegmatic, then he will not ask for help from his mother, thereby beginning to withdraw into his complexes, from which it is not so easy to get out of);
- discrepancy between the atmosphere prevailing at home in the process of working according to the Montessori system and the traditional school one.
Components needed to organize learning at home
The entire learning process is based on the child’s interaction with the learning material. It can be played by a variety of objects: specially purchased or made toys, cards, household items (jars, brushes, lids, scraps of fabric, etc.), books, geometric shapes, three-dimensional letters and numbers, paints, plasticine, etc.
An important component of Montesori lessons are musical greetings. They allow you to come up with simple actions for each phrase that are easy and interesting for your child to repeat. This makes it possible to stretch your arms and legs, develop memory, attentiveness and observation.

Educational material is easy to make yourself
The Montessori method is available for implementation at home. All the necessary gaming material can be purchased or made yourself. And children's songs are easy to find and download on the Internet. All parents need is determination and a desire to help their child. And even if there are two children of different ages in a family, they can perform different exercises, but from the same play area, while the older one helps the younger one.
How to organize classes at home?
To implement Maria Montessori's approach, parents must start by creating a suitable atmosphere, that is, zoning the space. These zones are filled with suitable didactic material and help adults maintain order and children navigate the “toys” well. By the way, work in most schools for the early intellectual development of children is based on Montessori zoning.
- Practice area. Here children receive basic everyday skills. At different ages, brushes, dustpans for sweeping floors (for a one-year-old assistant), various lacing, buttons for developing motor skills (for two-year-olds), sets for cleaning shoes, washing or even polishing (for children over 3 years old) are placed here.
- Perception zone. All its elements differ in shape, color, weight and size (bottles, jars, mugs, lids). In this corner, the child trains motor skills, tactile sensations, as well as memory and all types of attention.
- Mathematics zone. All subjects here are related to mathematics and are designed to improve abstract thinking skills, as well as cultivate patience and perseverance. The materials can be sets of counting sticks, sets of three-dimensional geometric shapes, etc.
- The tongue area is everything you need to learn to read and write. Volumetric letters, cubes, copybooks, alphabet.
- The space zone introduces you to the surrounding world, namely the mysteries of nature, weather phenomena, and the culture of different countries of the world. You can use animal figurines, cards, shells, pebbles, books, etc. as materials.
These 5 zones are actually freely located in one small room. The main thing is that all their contents are organized and accessible to the child.

To obtain the desired result, adults must competently organize the space surrounding the baby.
“Lessons” according to the Montessori system cannot be fit into a specific time frame: the child must study when he has a desire. For example, on Saturday afternoon you start cleaning your apartment. At this time, the little one goes to his practice corner and, taking a brush, helps you. Here is the technique in action!

The child should feel involved in everything that adults do
Many parents wonder: how often do you need to change the type of activity? Methodists do not answer it unequivocally. The thing is that each child is individual, that is, mothers and fathers feel when the little one is tired of working, for example, with a noise bag and it’s time to move on to working with blocks. Just an important condition: you can start a new job only after the previous one is completed and all the equipment is put in place. It is also necessary to take into account the fact that for some activities the baby needs a companion, for example, to play lotto. So the principle of non-intervention of the parent does not apply to joint games.

The adult’s task is not to help, but to observe what children do with this or that material.
Classes using this developmental method do not require any special toys or aids. The principles of Maria Montessori relate more to organizational issues than to content. However, there are many options for creating your own educational equipment. It differs not only in the manufacturing method, but also in the age at which it is advisable to use it.
Classes for babies under 1 year old
The principle of choosing toys for toddlers at this age is the more sensory sensations, the better. In general, anything that will do:
- rustles;
- makes noise;
- changes.
For the game use:
- filled bags for training vision and tactile sensations (for them we take fabric of different textures, smooth or with a pattern, and for the filler - cereals, beans, polystyrene foam, small pebbles);
- non-empty, tightly closed bottles, boxes and jars for training auditory sensations (pour sand, granules, pebbles, etc. into them);
- beads, beans, pasta - only under adult supervision!

During the game, the child should be comfortable, this applies, first of all, to clothing, posture and place
A baby under one year old is interested in the properties of objects, but the result is not particularly important, so the games consist of:
- holding out an object to a toddler (to practice finger grip);
- naming what is in your hands (to develop memory);
- transferring the baby from one hand to the other.
These actions can be accompanied by children's songs or poems (both performed by parents and in audio recordings).
DIY educational Montessori toys for children under 1 year old - video
The best exercises for children from 1 to 2 years old
At this stage, we not only train finger motor skills, but also continue to develop sensory perception, and also give basic ideas about order.
Game materials and contents
Starting from the age of 1, the baby can already concentrate his attention, actively imitates adults and peers, and understands that some of his actions lead to one or another result. The age begins when the child must be given the opportunity to be alone. But only if the toys he plays with are absolutely safe. Here are some useful games.
- "Secret chest" We put unnecessary bottles, jars, and boxes into a large box. An important condition: they all must be covered with lids. Place something small in each item (from beans to Kinder Surprise toys). By spinning these containers, the child will not only satisfy his curiosity, but will also actively develop fine motor skills of his fingers.
- "Breadwinner". We take a plastic toy (preferably an old one, so you don’t feel sorry for it), cut its mouth and invite the little one to feed the simulator with beans, peas, or beads. Due to the fact that a small object is difficult to grasp with your fingers, much less put into a small mouth, the baby will train motor skills, eye and patience.
- “Magic basin” or favorite toy for a child 9–15 months. Pour cereals and pasta into a relatively deep and wide bowl or basin. We “bury” small objects (chestnuts, shells, toys) in this content. The baby's task is to find what is hidden. Parents first show it themselves, and then allow him to play on his own, but under supervision.
By the way, you shouldn’t give up this toy even in adulthood: it’s enough to complicate the task, for example, find all the red objects or all the blue ones.
- “Peresypaka” (a game with cereals) will definitely captivate the baby. From one bowl, the little one should pour the contents with a spoon into another. If you have a children's mill, then pouring in the cereal will become even more fun.
- “Let’s replenish the piggy bank.” We take a piggy bank or jar, making a slot in it slightly smaller than the size of coins or balls, acorns, etc. The little one must make an effort to push the object into the jar. To make it more complicated, we make several slits at different angles.
- "Tailor". Children at 1.5 years old usually learn to cut with scissors quite quickly. True, you need to show them on both hands - this way they understand the principle faster. The game could be like this: an adult holds a strip of paper, and the little one cuts it. Children are very fascinated by the process of dividing an indivisible whole into parts. You can diversify the activity with two pieces of fabric, on one part of which there are buttons of different sizes and textures, and on the other - loops, also varying in size. Kids enjoy unfastening and fastening such exercise equipment.
- "Modeling." At this age, it’s time to introduce the child to plasticine: spinning balls, rolling sausages. As for the actual creation of figures, they must be sculpted from a sample (for example, pictures, toys, so that the little student can see the end result), decorating and supplementing with available means (matches, leaves, acorns, etc.).
- "Water". We place different containers on a wide tray. The baby must pour liquid from one to another, possibly through a funnel. You can also dip small pieces of a dishwashing sponge into water, and then wring them out, taking out pebbles, shells or beads “from the bottom of the sea.”
- "Artist". Print out the drawing template, prepare glue and pieces of colored paper. Apply glue to the areas where you need to identify this or that piece of colored trim. Show it yourself first, and then let your child try it.
There are also well-known Montessori toys for baby development. At this age, laces are suitable (for example, in the form of a cardboard shoe with holes for threading a lace or a boot with a zipper), “Red Bar” to create an idea of size, “Pink Tower” to understand the essence of “big”, “small”, “ biggest”, “smallest” and “Brown ladder” so that the baby understands what “thin”, “thick”, “thinest”, “thicker” means.
Wooden Montessori toys for baby development - photo gallery
With the help of the Pink Tower, the child will quickly learn the concepts of “big” and “small” With the help of the Red Barbell, the child will quickly learn the concepts of “long” and “short” With the help of the Brown Ladder, the child will quickly learn the concepts of “thick” and “thin”  Lacing develops fine motor skills of a child's hands well
Toy library for children from 2 to 3 years old
The role of the adult is moving more and more into an observational position. At this age, children already understand that in order to achieve some result they need to learn something. This process fascinates them incredibly.
- "Constructor". Just not store-bought Lego. Use pebbles, pieces of fabric, straw, ropes, pieces of wood, and shells. The adult’s task is to put the materials at the child’s disposal and... observe. And the little one will find a way to combine them.
- "Puzzles". We take old postcards and cut them into 2, 3, 4 (depending on age) parts. We show you how to put together a picture. Children enjoy this activity.
- "Sorter". Gradually teach your child that, for example, strings for tying pictures are in a blue box, and beans for feeding animals are in a red box. This way the child will get used to grouping objects by color, size, method of action, quantity, etc.
You can use wooden toys: “Geometric figures”, “Box with spindles” (a box divided into sections to be filled with wooden sticks, used for teaching counting).
Games for children 2–3 years old - photo gallery
Joint classes of parents and children from 1 to 3 years old according to the Montessori system - video
Montessori method for teaching children from 3 to 6 years old
Work at this age differs in form from the previous stages, making the child a full member of the family who performs the same responsibilities and has the same rights as other relatives.
After 3 years, your child’s interest in the practical side of life is no longer so great. But during this period you can develop perseverance and complicate previously learned skills, such as:
- self-care (not just brush your teeth, but wash and put away your brush, participate in preparing breakfast, wash the dishes, if not all, then at least a cup);
- cleaning the house (you can add mopping and dusting to sweeping);
- cleaning the pet rug and caring for indoor plants.
Interest in exercises for the development of sensory perception in children at 4–5 years old decreases. However, at this age, kids enjoy playing with kinetic sand (regular sand can be colored with a solution of food coloring). Classes may include:
- mixing different shades;
- creating drawings on glass;
- lining up sand buildings, comparing them by size and color, etc.
Instead of noise bags, you can use real musical instruments (the more varied, the better, if, of course, the parents have strong nerves).
It’s also time to show your child how to concentrate on one quality of an object. For example, smell a tangerine with your eyes closed, that is, make smell and touch the main sources of perception, excluding vision. Gradually, the baby will learn to focus on 1-2 properties, dividing them into important and secondary ones.
At 4–5 years old, the child begins to show a special interest in writing. The following exercises can be used to train this skill:
- printed shading;
- writing on semolina or sand with your finger;
- writing letters with chalk on a blackboard;
- making words from letters on cubes or magnets;
- mastering copybooks.
An important stage of speech development is learning to read. The technique assumes:
- sound identification games (for example, guess what it’s about: it’s something that’s in the room and starts with “C”);
- a box with small items that are signed (an important point: the letters in the words must be read the same way as they are written);
- classes with cards on which words are written, the names of objects in the surrounding world, where the names of the letters coincide in pronunciation with the spelling;
- reading homemade or purchased books with large pictures and 1–2 accompanying sentences.
But interest in mathematics at 4 years old, on the contrary, increases significantly. Montessori exercises involve the use of materials from the sensory block. You need to focus your work on combining the visual image of the number with the name. For example, if you need to get a toddler to remember that 2+2=4, then it makes sense to offer to combine the required number of beads or coins with the number written on the card.
Starting from 5–6 years old, the child wants to learn in detail what the world around him looks like. So play lotto, where the chips are pictures of flora and fauna, read interesting facts about animals, countries and peoples.
Let the child draw, and there is no need to interfere with the process. And also create applications and make herbariums. You can use plasticine and polymer clay for your work. The main thing is that the young creator enjoys performing various manipulations with creative materials.
Creative development at 3–6 years old - photo gallery
 Magnetic letters will help you learn the alphabet Drawing with your finger on the sand will help you further develop tactile sensations Drawing on a blackboard will awaken your child’s interest in writing Reading together will teach your child to love books From the age of 4, interest in numbers increases, which expands the possibilities for games Children themselves combine different materials while playing for games
Video: examples of classes with children from 3 to 6 years old using the Montessori method
Maria Montessori's method fits into any system of family relationships and is practical in nature. The child does not need to be forced to do something: you just have to see what he is doing and direct the energy in the right direction. And by showing a little imagination and using advice from online communities, you can make the material base for classes no worse than in specialized groups of developmental schools. The main thing is that the parents are interested - then the baby will also be excited about the process of learning new things through practice.
Share with your friends!Maria Montessori developed a special program for working with children aimed at broadening the horizons of preschoolers and instilling in them everyday skills that will certainly be needed in later life. Children perform exercises using the Montessori method with great pleasure, because they are fully involved in this exciting process, which takes place in a playful way.
Montessori always emphasized the importance of stimuli for the development of the corresponding human senses. When a child goes through sensory periods in his development, it is extremely important that he encounters appropriate activities in his environment. For example, if we want to develop an ear for music, we need at least a musical instrument, and to develop color vision, colored pencils and paints are absolutely necessary.
In a classroom where children are taught according to the Montessori method, the bulk of the so-called sensory materials are located near the area of daily living. Like everyday exercises, sensory activities follow the main sequence of educational steps: from the concrete to the abstract, from the development of the hand to the development of the brain, from motor and sensory exercises to, from actions to the ability to express thoughts.
In sensory exercises with Montessori materials, one sense is often highlighted, followed by a complication of interconnected teaching materials: for example, learning about color can begin with three primary colors, gradually we will move on to the seven colors of the rainbow - to shades of primary colors, to the ability to combine them and obtain new varieties of color solutions. Therefore, in our activities with the baby, as he grows up and masters certain skills, we can always move on to new activities based on what has already been well mastered, turning on our imagination and involving more and more new household chores.
Remember the words of Maria Montessori:“Observe your child and meet his needs”!
Never force your child to do what you want - he has the right to his opinion. It is important that he is free to study the material and can create on his own.
On this page you will learn how to work with children using the Montessori system to teach them a variety of skills.
Classes with elements of the Montessori program for the development of auditory memory
Check if he can isolate individual sounds? Is he able to sort sounds according to their characteristics (high - low, short - long, bird sounds - insect sounds, etc.).
Maria Montessori's "Sound Lotto" exercise is recommended for children aged 3-4 years.
The purpose of the lesson is to develop auditory memory and the ability to sort by sound.
For this lesson with children using the Montessori method you will need:
- several large lotto cards with images of various objects and animals that make some sounds (for example, a pig, a cow, an airplane, a train, a vacuum cleaner, a bird, a dog, a cat, etc.). You can use store-bought or home-made lotto cards;
- a set of small cards with pictures corresponding to those on the larger cards.
How to complete the activity according to the Montessori program (the number of players is limited by the number of large lotto cards):
- Deal large cards to the children and yourself. Small cards should lie face down on the table.
- Start the game by choosing one small card. Turn it facing you and play a sound characteristic of the animal or object depicted on it.
- Ask your child to guess what it is. If he guessed correctly, he can take the card and cover the corresponding picture on his big lotto card with it.
- Then the child also takes a small card from the pile and repeats your actions. You guess, but if your big card doesn't have a matching picture, return the card to the bottom of the pile of small cards.
The first one to cover all the pictures on the big card wins.
Control - visual (comparing the picture with the sound).
During Montessori lessons, make sure your child knows the names of objects and animals. To do this, this game can first be used to familiarize the child with different objects and animals, and only then to study the sounds they make.
By the way, making large and small cards together with your child in preparation for the game will give you the opportunity to repeat with your child the names of all the animals, birds, cars, etc. depicted on them, as well as get to know new characters.
Expansion of activities:
- Instead of small cards, you can use miniature copies of cars, figures of animals, birds, etc. In this case, the child learns to compare two-dimensional and three-dimensional images.
- The next step could be the transition to sorting according to the criteria “living - non-living”, “bipeds - quadrupeds”, counting the number of animals, birds, objects, etc.
Exercise for teaching children the basics of mathematics using the Montessori system
Check if your child knows the names of geometric shapes? Can he distinguish them?
The exercise “Flat shapes” for teaching the basics of mathematics using the Montessori method is recommended for children 3-4 years old.
The purpose of the lesson is to teach the child to recognize geometric shapes by appearance and touch. This will prepare him for further mathematics studies.
For this Montessori lesson you will need three sets of geometric shapes:
- first set- with straight sides (square, rectangle, triangle);
- second set- with curved sides (circle, oval, etc.);
- third set- with mixed sides - straight and curved (semicircle, etc.).
Each set should be white on one side and colored on the other, for example, green for the first set, orange for the second and blue for the third.
Three additional sets of cards on which all the geometric shapes described above are drawn.
In set No. 1, the geometric shapes are completely painted over; in set No. 2 they are outlined with thick lines, in set No. 3 - with thin lines.
There are three options for conducting this activity with children using the Montessori system.
Option 1 - familiarization with geometric shapes (we use a three-period Montessori lesson).
- We show the baby two different figures, differing as much as possible in shape: “This is a circle,” “This is a square.” Be sure to trace the outline with your index and middle fingers and invite the child to repeat our actions.
- When addressing the child, we ask him: “Give me a square”, “Give me a circle” (as a rule, first we ask him to give the figure that was shown last).
- If the child completes our task correctly, we ask him: “What is this?”
It is quite possible that the baby is ready for further work, and we can supplement the number of figures being studied with a third and fourth figure.
But if the child gets confused, do not insist and return to this game after a while.
Option 2 - for children who know the names of basic geometric shapes.
- Place all sets of geometric shapes mixed on the table, white side up.
- Ask your child to feel the shapes from all sides and sort them into three groups.
- When he does this, turn the cards over. If the colors are the same in each group, then the geometric shapes were sorted correctly.
Option 3 - for children who already know how to lay out geometric shapes by touch.
Have your child take the first extra set of cards with geometric shapes drawn on them and sort them into three groups as described - straight sides, curved sides, straight and curved sides.
To check the correctness of the task, the child combines individual geometric shapes with drawn ones and controls himself by the color of their reverse sides, turning over the geometric shapes.
If desired, during a lesson using the Montessori method, you can repeat this game with a second and third additional set of cards.
Exercise with material from Maria Montessori to develop the sense of touch
 Check whether the child can distinguish fabrics of different qualities (wool, silk, cotton, etc.) by touch.
The “Sensory Lotto” exercise is suitable for children 4-5 years old.
The purpose of the lesson using the Montessori method is to learn to determine quality and form, and develop the sense of touch.
What do we need:
- Four identical large cardboard game cards, divided into eight squares. Eight pieces of the same material of a certain color are glued onto each of them (for example, large card No. 1 - red velor, large card No. 2 - blue silk, large card No. 3 - green cotton, large card No. 4 - yellow wool), different from each other from each other in shape (triangle, circle, square, oval, star, rhombus, rectangle, trapezoid).
- Thirty-two individual small cards. On each of them there is glued one geometric figure made of a material corresponding in quality and color to one of those used to design the large cards.
- You can buy a similar game. To make it at home, cut out two identical sets of geometric shapes from four types of material of different colors, eight shapes of each color. In total you will get 64 figures, differing from each other in the quality of material, color and shape. Glue one set of eight shapes of the same color onto each of the four large cards. Glue the second set of shapes to 32 thick individual cards.
For younger children, you can make one large game card and one set of eight small cards using sandpaper.
How to do the exercise (for four people):
- Each player chooses a large card. The corresponding small cards are placed face down in front of her.
- One player is asked to feel the shape on an individual card and then find the corresponding shape on the larger card. To prevent your child from peeking, turn the card face down or blindfold him with a soft blindfold.
 Control - visual (matching the shape of geometric shapes).
During this developmental lesson using the Montessori method, you need to be sure that the child knows the names of geometric shapes. If you doubt his level of knowledge, use the preparation of materials for the game to familiarize your child with geometric shapes and consolidate his knowledge.
Expansion of activities:
Option 1
Ask players to point out certain geometric shapes on large maps or count the number of shapes, such as circles or squares.
Option 2
An older child can select shapes by touch from one large pile of small cards. If the color of the large card and the small cards do not match, the latter are returned to the pile, at the bottom.
A task using the Mntessori method for the development of visual memory and fine motor skills
 The lesson with children “Remembering” according to the Montessori method is carried out with children 5-6 years old.
The purpose of the exercise is tactile sensitivity and coordination of movements of the muscles of the fingers (fine motor skills).
For this lesson in the Maria Montessori program you will need:
- One game board with 48 holes covered with discs.
- Eight “command” cards, each of which shows a mix of two thematic sets of 24 different items each - geometric shapes and toys, color combinations and musical instruments, patterns and vehicles, numbers and animals, etc. The “command” card is pushed in under the holes of the game board along the side grooves on the underside of the board.
- If we can’t buy this game, we’ll try to make a simplified version of it ourselves. To do this, we will use only large cards, divided into 48 squares, with 48 pictures pasted on them according to the principle described above. You can cover the pictures during the game with clean white small cards, which will subsequently mark the points won.
- The level of difficulty of the game should constantly increase: some cards are suitable for younger children, others for six-year-olds and older.
How to conduct a lesson with elements of the Montessori method (for two or more people):
- Select a command card and insert it into the slots on the board.
- Each player takes turns opening two holes at the same time and looking at the pictures in them.
- If two pictures do not match each other in theme, the discs must be returned to their places, the turn passes to the other player, and everyone else tries to remember the location of the pictures.
- If the pictures form a thematic pair, the player must name it. He can then put the discs aside - these are his points - and continue the game.
As you may have guessed, the main task of the exercise is to try to always open pictures that form thematic pairs (for example, “clothes”, “transport”, “birds”, etc.), and thus score the most points.
Working with paper using the Montessori method
 Check if your child knows how to carefully tear off pieces of paper? Can he use scissors to cut off part of a sheet or cut out a picture he likes?
This paper exercise based on the Montessori system is carried out with children 3-4 years old.
The purpose of the lesson is to improve the child’s control over the muscles of the fingers, provide knowledge about shapes and sizes, help in mastering terminology and expanding vocabulary.
For such a lesson with children using the Montessori system you will need:
- cigarette paper,
- old magazines and newspapers,
- children's scissors with rounded ends.
How to practice:
- Show your child how to fold newspapers or individual pages of old magazines with both hands, then how to pull and tear them off (using the “working” hand, i.e. the one with which he is used to working). Let him tear newspapers into pieces as much as he wants.
- Once he has mastered this activity, show him how to cut strips and squares with scissors.
Visual control - neat edges of a torn or cut strip of paper.
During such Montessori developmental learning, rest assured that children's scissors can actually cut paper (and not just crumple and tear, as often happens!).
- The child should know that scissors are sharp.
- Newspapers and old magazines are more convenient to use, since their paper is usually very thin and a child can easily handle it.
- The child must be able to carry scissors and carefully hand them to another person.
Expansion of activities:
- You will need glue and thicker paper for gluing the pictures.
- Once you have a sizable stack of cut-up paper ready, have your child draw the outline of a house or tree, and then show how to glue on pre-made scraps of torn or cut paper. As you practice, the pictures may become more complex in design and shape.
Application lesson using the Montessori method
 Teaching children to make applications according to the Montessori system is carried out with children 4-5 years old.
By making a collage with your own hands, the child gets real pleasure. There is complete scope for creativity here, because the variety of materials used produces different effects.
For this lesson using the M. Montessori method you will need:
- The main materials are glue (preferably a glue stick), cardboard, thick paper, wood, cork, paper plates or a large piece of fabric.
- A set of related materials such as tissue, decorative or wrapping paper, braid, cords, fabrics (cotton, wool, etc.). In reality, anything you were going to throw away is usable.
- Sometimes additional fastening materials are needed (adhesive tape, tape, paper clips).
How to do the exercise:
- First, let your child master gluing individual materials onto paper.
- Then have him draw the outline of, say, a bird, or a more complex picture like a garden, or even a geometric pattern.
- Invite him to fill in the middle of the picture by gluing different materials there (selecting them according to color and quality of material).
Watch the video “Montessori Lessons” to better understand how to teach children using the Italian teacher’s method:
Sewing lessons with children using the M. Montessori method at home
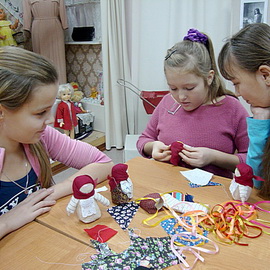 Sewing classes using the Montessori method at home are conducted with children 5-6 years old.
Children can start sewing before the age of five. Preparation for sewing at age three can include stringing large buttons or beads onto strong thread or fishing line of the appropriate diameter. A five-year-old child can be asked to sew using very loose fabric (for example, canvas).
The goal of sewing according to the Montessori method is to develop small muscle motor skills. This kind of work forces you to concentrate and brings great satisfaction.
What you will need:
- a set of large needles - not too dull, as this may make sewing difficult and the child will drop it. (By the way, parents who use the Montessori method are not afraid to give their children sharp needles.):
- set of cotton and silk threads:
- dense material such as felt or linen.
How to do this task using the Montessori method:
- First, show your child how to put simple stitches, later - more complex ones, such as “cross stitch”, “forward needle”, How to sew a button.
- Try to have your child make the items you need for homework, and always use his product in front of him.
Applique and working with patches are also fairly simple needle activities that an interested child can easily master.
Lesson at home using the Montessori system with floating and sinking objects
 Check if your child knows that objects can be sorted by degree of buoyancy? Can he name objects that float on the surface of the water and objects that sink? Help him learn about this through the example of, say, fruits, vegetables or various toys by placing them in water in a bathtub or basin.
Classes at home using the Montessori method with floating and sinking objects are carried out with children 3-4 years old.
The goal is to help the child remember which objects float and which ones sink.
What exercises according to the Montessori method will be needed:
- A large sheet of paper with a bowl of water on it, and a set of pictures depicting objects that could be used in the experiment.
How to complete the task:
- Ask your child to choose pictures one by one and place them on top of the drawn water or at the bottom of the basin, depending on what he knows about the ability of these objects to float or sink.
- If he does something wrong, show him using real objects as an example whether they float or sink, and then play with the same pictures the next day.
Before starting such a lesson according to the Montessori program at home, make sure that the child knows how to work with water, protect him from getting wet with a special waterproof apron.
Expansion of activities:
- This activity allows you to sort objects by the material from which they are made (and at the same time clarify that wooden objects usually float, and metal ones sink). Then these same objects can be counted in order to later find out how many of them drowned (let's move on to mathematics!)
Developmental education using the Montessori method: anatomy lesson
 Teaching the basics of anatomy using the Montessori method is carried out with children 4-5 years old.
The goal is to help your baby learn more about the parts of the body and how they work. This will create interest in the workings of his own body.
For this Montessori exercise with children you will need:
- A very large sheet of cardboard - larger than our child.
- Several bolts or other similar things to fasten the cut parts together.
- Linen elastic band and pen.
How to complete the task:
- Tell your child about the main parts of the human body. Then ask him what he can and cannot move. Explain to him what a joint is and ask him to find all the joints in his arms, legs, hands, feet, etc.
- Trace the outline of his body and, along with it, mark in the drawing where the joints are located on the body.
- Cut the design at the joint locations, and then connect the pieces back together using fasteners and rubber bands.
- Once this is done, talk about his spine and relate it to the animal classification game. The child must understand that he, too, belongs to vertebrates.
How to exercise with water using the Montessori method
 Experiments with water in the kitchen are carried out with children 5-6 years old.
The child will witness different temperature effects on water and actually see that water can be solid, liquid or gas. “Kitchen experiments” will force him to observe and ask questions, and this is exactly what is required during further studies at school. They will also help to understand the water cycle in nature and its impact on weather changes, and this is a step towards understanding geography.
For such a home lesson using the Montessori method you will need:
- Eight empty jars to make Montessori jars.
- Fill two jars with cold water, two with cool water, two with warm water and two with hot water (but not enough to get burned).
- Water thermometer.
- A teapot and a mold for freezing ice for the second stage of the experiment.
- A drawing explaining the water cycle in nature.
How to do the exercise:
- At the first stage, the child becomes familiar with temperature. Ask him to close his eyes, touch the jars and place them in pairs, that is, two next to cold water, two with cool water, two with warm water and two with hot water.
- Explain to him how you change the temperature of the water. If you have a water thermometer, measure the temperature of the water and try to determine the boiling point and freezing point of the water.
- Show your child how when you heat a kettle, when the water reaches boiling point, it turns into steam, which evaporates like a gas. Make sure he understands that steam always goes up and never goes down.
- Pour some water into an ice cube tray and freeze it. Show your child how water turned into ice and became solid. Discuss with him the freezing point at which the ice formed.
- Continue to explain the water cycle in nature using the picture: Every day the sun heats the water in rivers and lakes, and some of the water evaporates (turns into gas). This steam rises like steam over a kettle. As it rises, it cools and forms tiny droplets of water that form clouds. Gradually, the droplets increase in size and return to the ground as rain. When it's cold enough, rain falls in the form of snow or hail. On earth, the water cycle begins again.
Montessori classes for children to introduce healthy foods
 “Food game” is carried out with children 5-6 years old.
The goal of the game is to give the child knowledge about the main food groups that a person needs; form the concept of healthy food.
What you will need:
- Large sheet of paper.
- Pictures depicting different foods. We can cut them out from magazines or draw them with the child.
- Double-sided transparent adhesive tape (scotch tape).
How to practice:
- Divide a piece of paper into seven sections and label each section with the names of different food groups: fruits and vegetables, meat, milk and dairy products, bread, cereals, butter and sugar.
- Every time you eat, discuss what you ate, choose the appropriate picture and stick it on your chart.
- At the end of the day, you can discuss together what you ate and decide what you need more for the next day.
Expansion of activities:
- Our kitchen is a wonderful place to get acquainted with mathematics: the child learns about the shape of an object and its area by selecting a lid for the desired pan.
- Measuring length, weight, volume - all this can be easily done at home. For example, when preparing food, you and your child can count, measure and weigh the necessary products - this is his first step towards science.
- Older children can prepare simple meals on their own from start to finish. They will learn the difference between weight and volume, and become familiar with concepts such as gram, kilogram, liter, etc.
- Let's put a measuring cup or scale on the table in front of the baby's eyes so that he can clearly see the scale, and let him measure out the ingredients for us. As a result, five- and six-year-olds can easily navigate if they need to add half or a third to the amount they already have.
- Introducing a child to subtraction will also happen without problems if we deliberately put too much product and ask him to put some aside so that it is correct.
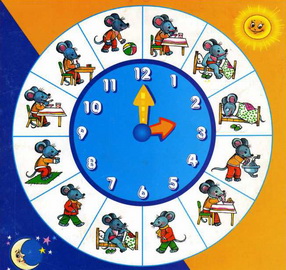
Exercise according to the Montessori system to prepare a child for school
 Check if your child knows the basic concepts related to the topic “time”? Does he compare the concepts of “morning”, “day”, “evening” and “breakfast”, “lunch”, “dinner”?
This exercise according to the Montessori system can be performed starting from the age of 3.
The goal is to further develop the sense of time.
What you will need:
- A long sheet of paper, approximately 30 cm wide, divided into parts by vertical lines. In each part we will write the time - starting, say, from 7.00 and ending with the time when the child goes to bed. Let's also draw a clock.
- Pencils and markers.
- Glue stick or adhesive tape (scotch tape).
How to do the exercise:
- Ask your child to draw a picture of himself getting up or having breakfast in the morning. Talk to him about what he will do after breakfast, and gradually remind him that after breakfast he goes to kindergarten, plays in the park (garden), has lunch, goes home, goes shopping, drinks tea, watches TV, reads fairy tales, washes, has dinner and goes to bed. When the child remembers all this, he can draw the necessary pictures.
- Paste these pictures on your daily schedule under the appropriate time.
- Post the daily routine in his room or somewhere where the child will often look at it and remember what else he needs to do.
Try to note all the main points of the child’s daily life so that he can subsequently control himself.
Expansion of activities:
You can make hands out of thick paper (or cardboard) and attach them to the dial (for example, with a small rod) so that they can rotate and show a certain time.
Exercise for children on the topic “Daily Routine”
 An exercise on the topic “Daily Routine” can be performed with children 4-5 years old.
This variation of the basic Daily Routine model will help your child feel connections between events in his life.
Often at this age, everything that has already happened is noted as “yesterday”, and everything that will happen is noted as “tomorrow”. Time is the most difficult concept for a child. The more you experiment and discuss, the better.
What you will need:
- A large strip of paper divided into six parts.
- Although you are expected to start working with a four- to five-year-old child, you will gradually work with him - so there are six parts needed. Each piece represents one year in a child's life.
- A set of photographs of the baby - from the moment of birth to the present.
- Glue or tape.
How to complete the task:
- Choose photos that clearly show your baby how he has changed over the years.
- Pin or glue the photos onto the “life routine” in the appropriate place. Tell your child about himself when he was a baby and let him ask questions.
Classes with children on the topic “Connection of events”
 The exercise “Changing a person’s home” is performed with children 5-6 years old.
The goal is to help the child understand the connection of events; make him think about the changes that occur over time, about the reasons for these changes.
What you will need:
- A long strip of paper - for example, old wallpaper cut in half works well. Divide the paper into at least six or seven parts and label those parts centuries and years.
- Drawings depicting the relevant types of housing: for example, a cave, a hut, a dugout, a black-heated hut, an ancient Roman villa, a medieval castle, a kremlin, a boyar's tower, buildings from the classical era, the early 1900s and a modern house. You can use ready-made drawings or copy what you need from books.
- Glue or duct tape.
How to do the exercise:
- Start by talking about your own home and the things you need. For example, we all sleep on beds, prepare food every day, and wash ourselves.
- Show your child the pictures you collected and ask him if he noticed any differences between the way cavemen cooked food and the way we cook it. It is very important that the child himself notices the similarities and differences.
- Now continue the conversation about why they prepared food differently from us, and perhaps you will touch on some of the important inventions that make modern life so comfortable and easy. For example, life changed dramatically after the invention of electricity. Electric light bulbs were first used in 1879, refrigerators - in 1879, electric irons - in 1882, the first electric stove - in 1889, an electric toaster - in 1909, an electric kettle - no later than 1923 and an electric dishwasher - in 1899 .
This game can be associated with a visit to a museum, which would make all these historical events very visual for the child.
Exercise with children to develop spatial imagination and memory
 Check if he knows what rooms are in your house (apartment) and what you can see in them.
The “House Plan” exercise can be performed with children 3-4 years old.
The goal is the development of spatial imagination and memory.
What you will need:
- Large sheet of paper.
- Pictures drawn by a child or cut out from magazines, depicting various furniture, such as a bed, chair, table, as well as a stove, refrigerator, etc.
- Markers or pencils.
- Glue or duct tape.
How to complete the task:
- Draw a plan of an apartment or house (perhaps with a shed or garage). Designate rooms as in your home.
- Discuss with your child what rooms are in your home and what you can see in them.
- Invite him to draw or choose pictures of furniture for each room and attach them to the diagram in the desired room.
Visual control - after walking around the house (apartment) with your child, you must find all the objects indicated by the child on the plan.
Pay attention to the expansion of the child’s vocabulary when meeting new names for him. Try to structure your conversation with him more often so that he constantly uses new words.
 Expansion of activities:
- In the summer, you can move on to drawing up a plan for your summer cottage and summer cottage.
- If you visit relatives, repeat this game by drawing a plan of their apartment or house, and when you visit again, check that the task was completed correctly.
Lesson on the topic “The house where I live”
The lesson on the topic “The House I Live in” is performed with children 4-5 years old.
The goal is to help the baby get an idea of how other people live.
What you will need:
- A set of pictures depicting various types of houses (such as an igloo, a house-boat, a village house in central Russia, a hut in the tropics, etc.) and their inhabitants (Eskimos, Indians, African aborigines, etc.).
- A similar set depicting animal houses (for example, a bird's nest, an anthill, etc.) and the corresponding animals.
- All pictures must be placed on cards.
How to do the exercise:
- Talk about different types of houses. Describe what they are made of, where they can be seen, how long ago they may have been built, and what they are called. Look how many different types of houses there are.
- Then show your child pictures of different types of houses and people. Ask him to determine which people live in which house.
- Relate this to the types of homes the animals live in.
- Play with the cards, matching animals and people to their homes.
The video “Montessori Method Classes” clearly demonstrates how such exercises are performed:
This article has been read 6,310 times.


